Valentine’s Day is a time to bring smiles to that special loved one. This year, you can set hearts aflutter with a handmade, hand-coded card. You will save the trees and spread the love.
Follow this easy Scratch coding tutorial to build a Valentine’s Day scratcher that reveals a personalized card.
What is Scratch? Scratch is a 100% free block-based programming language and it’s one of our favorites. Developed by the minds at MIT, the Scratch platform lets you drag and drop code blocks to build fun games and apps. Scratch is a great way to introduce younger students to coding and how to think like a programmer.
Try our Valentine’s Day Card Scratcher. Scratch off a heart to reveal a very special Valentine’s message.
Table of Contents
- Step 1: Create a new Scratch project
- Step 2: Upload game board and card images
- X, Y positioning in Scratch
- Step 3: Position hearts and scratcher sprite
- Step 4: Add a wand to scratch with
- Step 5: Wave your wand
- Step 6: Create the scratched heart effect
- Step 7: Add scratcher logic
- Step 8: Reveal your Valentine’s card
- Step 9: Show the game board when we restart
- Step 10: Add more scratcher hearts
- Your Valentine’s scratcher is complete!
What you need:
- Scratch account: Create a free Scratch account
- Starter files: Download the images we are using in our game. You can also use your own images to customize your application. Download starter files
No coding experience is necessary for this tutorial. Beginner-friendly for ages 8 and up. Give it a try!
Step 1: Create a new project
Let’s start by creating a new project.
Visit https://scratch.mit.edu/, login to your account, and click on the “Create” button.
Now, we can code your Valentine’s scratcher!
Hint: You can also remix this project and others to see the code.
Step 2: Upload game board and card images
A new project will open up and you can see the Scratch interface.
In the starter files, we’ve included images for your game board, Valentine’s cards, and candy hearts.
- Start by deleting the Scratch cat sprite that appears in every new project
- Add all of the background images by clicking “Upload Backdrop”
- In the Backdrops tab, select the “valentines_bg” image
These are the 6 different Valentine’s cards that can show after our user scratches a heart.

Hint: Instead of uploading backdrops, you can draw your own backdrops and add special messages here.
Recommended: Scratch Coding for Kids
X, Y positioning in Scratch
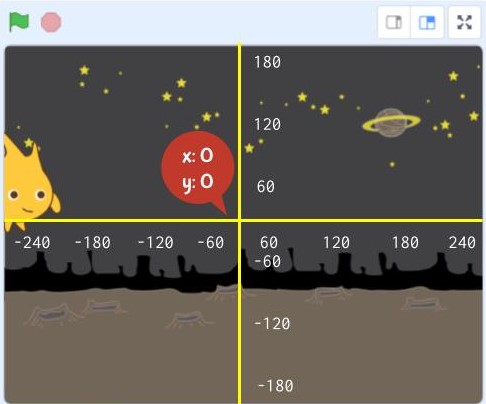
Before we move on, let’s talk about x and y coordinates.
Scratch uses x, y coordinates to position sprites on the screen. You might have seen these in math class.
- x coordinate – a number of pixels along the horizontal axis of a display starting from the pixel (pixel 0) in the center of the screen.
- y coordinate – a number of pixels along the vertical axis of a display starting from the pixel (pixel 0) in the center of the screen.
We’ll use these (x, y) coordinates to position our hearts and scratchers.
Step 3: Position hearts and scratcher sprite
In Scratch, your images are called sprites.
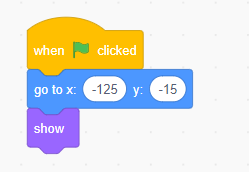
- Click on each candy heart sprite
- Add the “When Green Flag Clicked” block
- Change the x and y properties of each sprite using the “Go To” block
- Repeat these steps for each candy heart, in the different positions listed
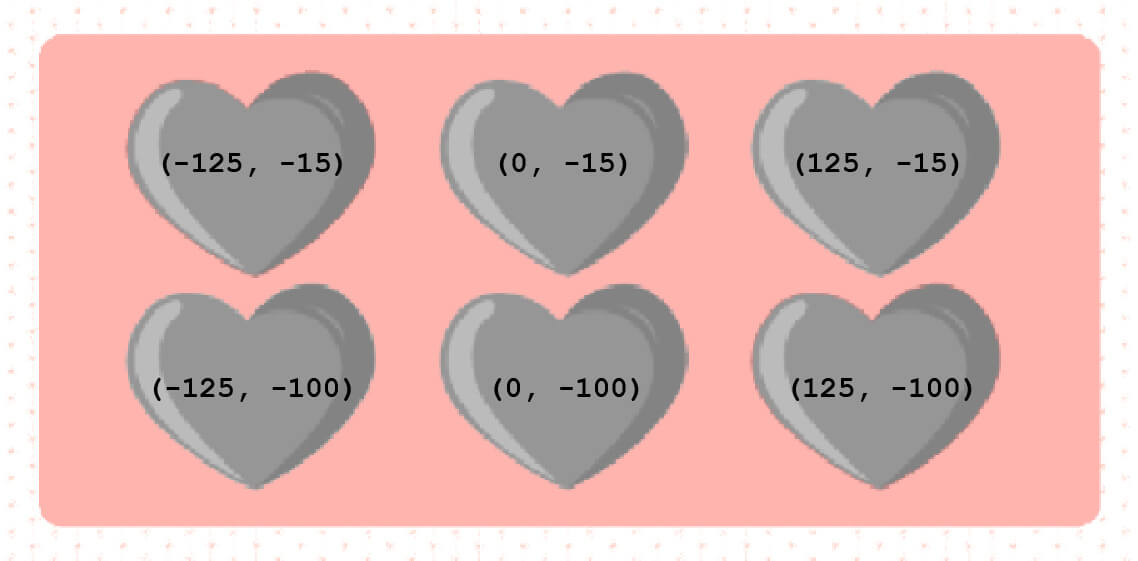
- Click on the scratcher heart and place it on top of the first candy heart using “Go Forward 1 Layers” block.

Hint: You can put any heart in any position. Change the x, y positions of each heart to match your theme and background.
Step 4: Add a wand to scratch with
Our first scratcher is in position! We just need a way to scratch it. You can use or create any sprite as your scratcher, I’m using a magical wand.
- Click “Choose a Sprite”
- Search for and select the wand
- Visit the “Costumes” tab to rotate the wand 45 degrees
- Position the center of the wand in the center of the artboard
- Go back to the code tab
Hint: Draw your own sprite to use as a scratcher. A claw, an arrow, a coin, you choose!
Step 5: Wave your wand
Next, we want the wand to follow our mouse cursor.
We can use a “Forever” block, which acts like a loop to repeat code. Pairing it with the “Go to mouse pointer” and “go to front layer” block means the wand will show up on the top and follow our mouse forever.
- Click on your “Wand” sprite
- Add a “Forever” block
- Inside the “Forever” block use “Go to Front Layer” and “Go to Mouse-Pointer”
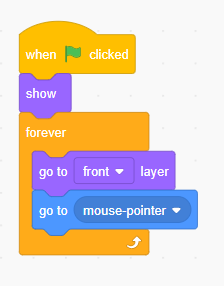
When you click the green flag, you should see your wand following your mouse.
Hint: You can also move your wand with your keyboard using an if-then the “Key Pressed” block.
Step 6: Create the scratched heart effect
Ready for scratching! Let’s create the scratcher effect every time our wand touches the silver scratcher.
Instead of erasing the actual sprite, we will create a series of costumes that look like our heart is being scratched off.
- Click on your “scratcher1” sprite and go to the “Costumes” tab
- Right click to “Duplicate” the costume
- On the duplicate costume, select the eraser and partially erase the heart
- Again, duplicate this new costume and repeat erasing until the heart is gone
- Rename the final costume “last”
- Reselect the first costume and return to the code tab

Hint: The more costumes you have, the longer it will take to reveal your card.
Step 7: Add scratcher logic
We’re going to reveal our candy hearts by changing costumes. When the candy heart is fully revealed, we will get to see our final Valentine’s card.
- Click on your “scratcher1” sprite
- Add a “Forever” loop and inside of it an “If-Then” block
- If the scratcher is touching the wand, wait and change to the next costume
Now, when your wand hovers over the scratcher heart it should begin to disappear. But, it’s not coming back?
- Add “Switch Costume To” block to show the full heart costume when green flag is clicked.

Hint: Instead of changing the costume when the sprites touch, you could also do it when you click on the heart.
Recommended: How to Make a Game on Scratch
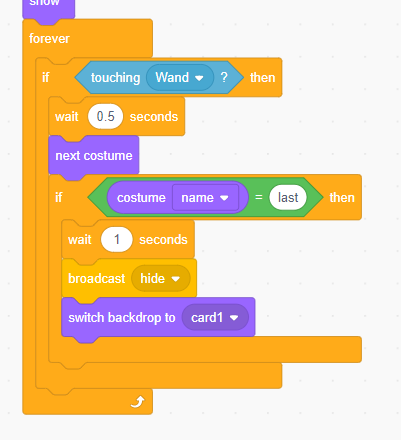
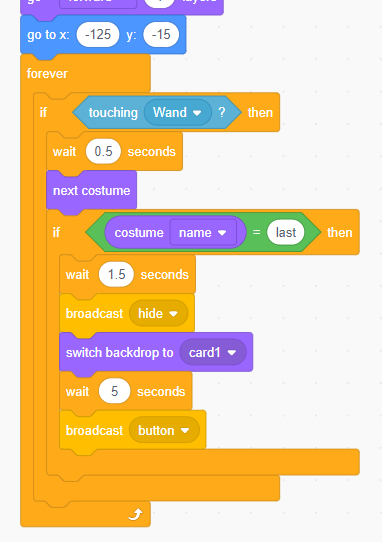
Step 8: Reveal your Valentine’s card
What should happen when we’ve scratched off a heart? We finally get to reveal our sweet Valentine’s message!
Each scratcher heart should reveal a different card. We will use the “broadcast” block to hide all the blocks and show our card.
- On our scratcher heart sprite, add another “If-Then” block (inside the first if-then block)
- If the costume name is “last”, wait for 1 second then broadcast a message to hide all sprites
- Then switch the backdrop to the card you want to show (card1)
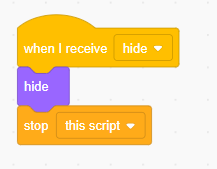
Your card will show up, but all of your other sprites are still showing up. The other sprites need to receive the “Hide” message and do something with it.
For each of the other sprites, use the “Hide” block when they receive the message and then stop the script.
Hint: You can easily copy blocks of code from one sprite to another. Just grab the code block and hover over the sprite you want to copy it to.
Step 9: Show the game board when we restart
When we click the green flag, our game restarts. We’ll want to show our game board and hearts again.
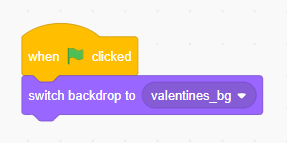
- Click on the backdrops and add “When Green Flag clicked” block
- Use the “Switch Backdrop To” block to switch back to your game board image
Hint: You don’t have to stick to just one game board. Add several and switch them when the green flag is clicked.
Step 10: Add more scratcher hearts
You have one scratcher working!
You can easily duplicate and update scratcher1 to cover the remaining hearts. Each new scratcher heart should reveal a different card.
- Right-click to “Duplicate” scratcher1
- Change the go to x and y position (0, -15)
- Change the backdrop revealed to card2
- Repeat to cover all candy hearts
Your Valentine’s scratcher is complete!
Put it all together and give it a try. The most important step is to send it to a person you love this Valentine’s Day.
https://scratch.mit.edu/projects/480067907/
You can “see inside” my project to get a peek inside the full Scratch code.
Free Scratch Tutorials
Recommended: Scratch Games
Download Free Printable Scratch Coding Tutorials PDF
Get the Rocketship Landing game and Flying Space Cat Scratch tutorials in a printable format.
Learn more about Scratch in our Elementary School Coding Program. It’s so much fun and the possibilities to be creative are endless!
Did you remix this project? Share a picture or link with us on Facebook or Twitter with #NowYouCode to be featured.
Hoping you have a sweet Valentine’s Day!