“Pig” is an easy and fun dice game that anyone in the family can play. You only need one die in hand and know basic arithmetic to play the game. It’s an entertaining way for kids to practice adding and learn about probability.
If there’s no one around to play with, you can challenge the computer! Build your own “Pig” game using Python that you can play anytime. This simple app will roll the dice for you and the computer and add up your points too. All you have to do is click.
Complete this Python coding tutorial to make your own “Pig” Dice Game.

This is a beginner Python tutorial that will walk you through all of the code from start to finish.
Play the completed “Pig” Dice Game.
Tutorial Steps
- Step 1: Create and display a welcome message with the game rules
- Step 2: Get the user’s name and create the game loop
- Step 3: Simulate rolling dice
- Step 4: Create a function to update the scores of each player
- Step 5: Display a formatted scoreboard
- Step 6: Determine the game winner
- Finished project!
What you need:
1. Text editor
We’ll be using the CodeWizardsHQ editor to write and run our Python code. If you’re a CodeWizardsHQ student, download the x_hour_of_code_2022 project for the completed code.
You can also use an online text editor like replit that allows you to author and run Python programs in a web browser.
2. An empty Python file
Create a new empty Python file and add your code there.
Our file is named main.py. If you’re using another platform to write and execute your code, you can choose whichever name you like.
This tutorial is for beginner Python programmers ages 11+. It assumes you understand basic Python code. Let’s get started!
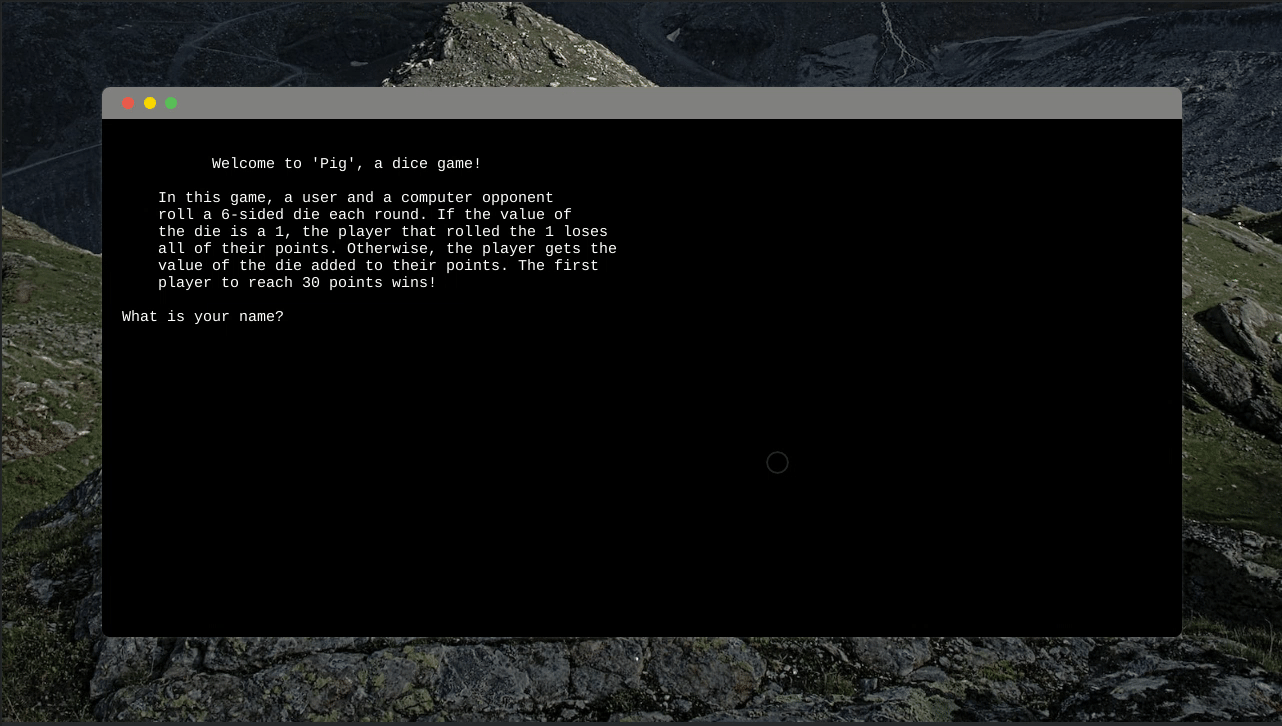
Step 1: Create and display a welcome message with the game rules
We’ll begin by displaying a welcome message to the user that explains the rules of “Pig”, the dice game we’ll build in this project.
- Create a multi-line string representing the game rules of “Pig” and store this string inside a variable called
welcome_message.
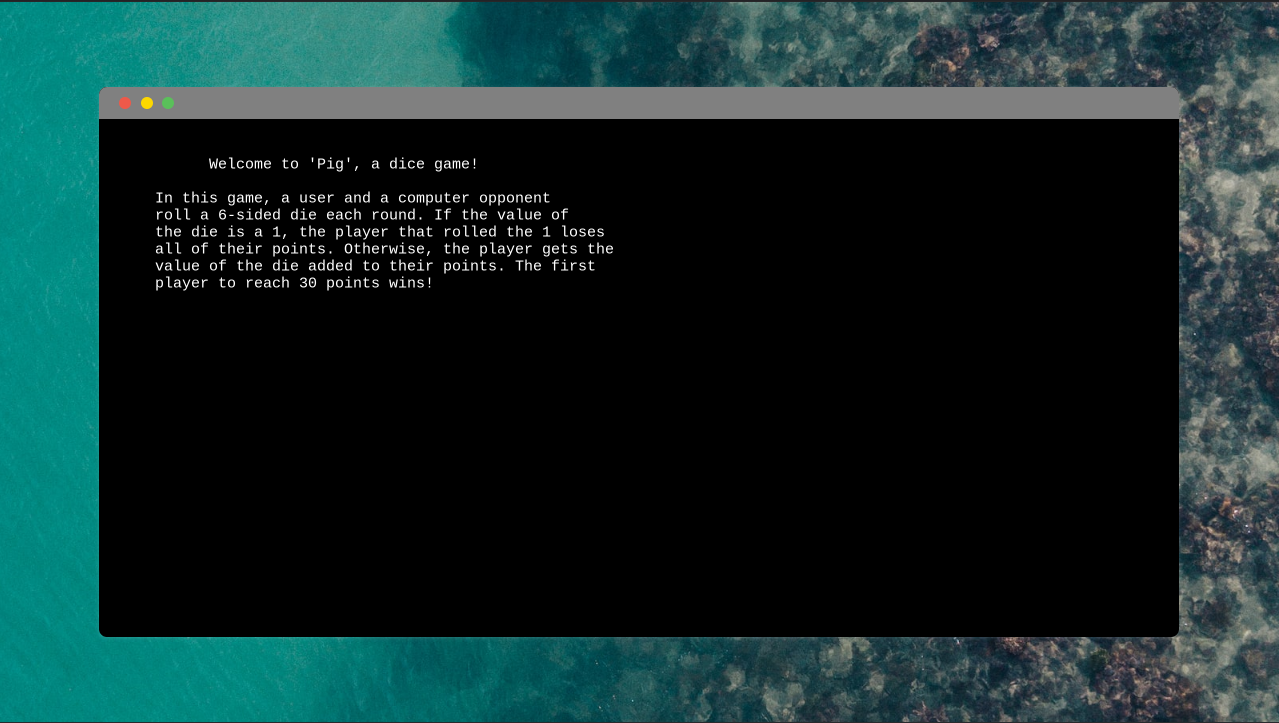
welcome_message = """
          Welcome to 'Pig', a dice game!

    In this game, a user and a computer opponent
    roll a 6-sided die each round. If the value of
    the die is a 1, the player that rolled the 1 loses
    all of their points. Otherwise, the player gets the
    value of the die added to their points. The first
    player to reach 30 points wins!
"""
- Use Python’s built-in print() function to display the welcome_message. Note, don’t type the … characters, those are used to hide unnecessary code from an example!
welcome_message = """
        ...
"""

print(welcome_message)
Step 1 Output:
Step 2: Get the user’s name and create the game loop
Prompt the user for their name, create a game loop, and allow the user to roll the dice.
- Create a variable called username.
- Use the input() function to prompt the user for their name and store it in the variable.
welcome_message = """
        ...
"""

print(welcome_message)
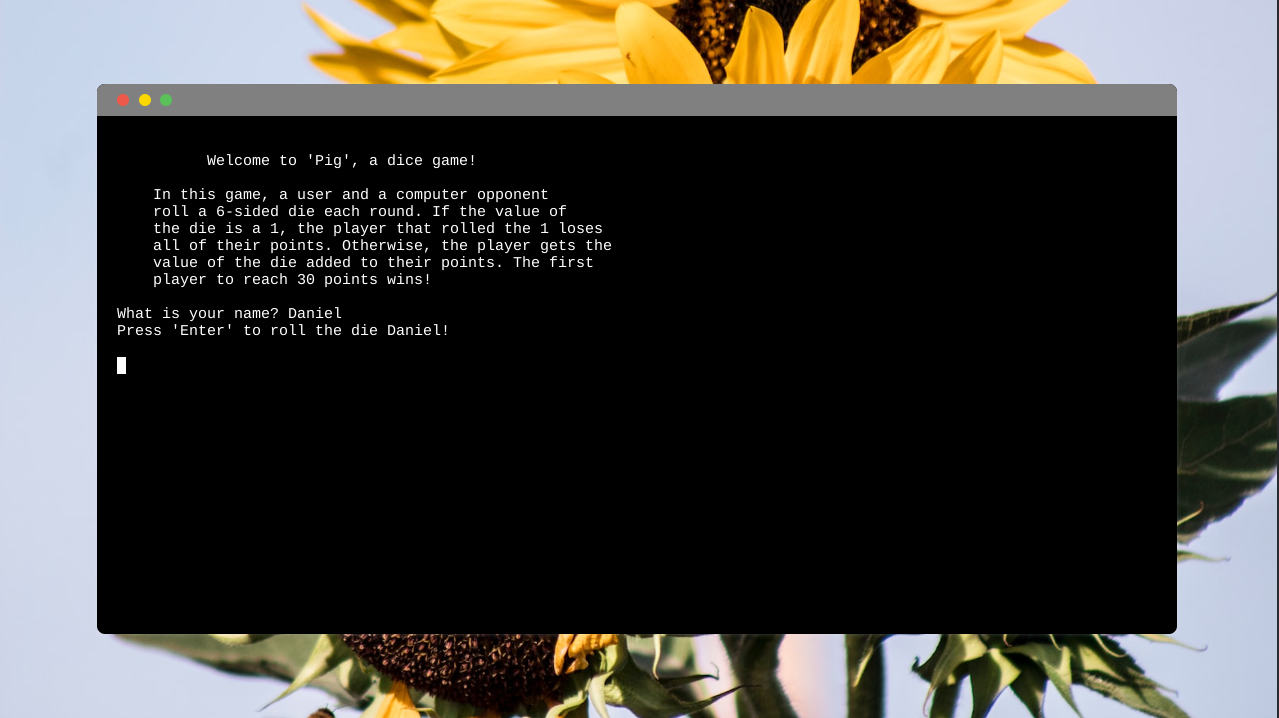
username = input("What is your name? ")- Create a while loop to represent the game loop.
- Inside the while loop, use the input() function to prompt the user to press “Enter” to roll the die.
username = input("What is your name? ")

while True:
input(f"Press 'Enter' to roll the die {username}!\n")- Add a break statement to ensure the loop only runs once. We do this while building a game to make it easy to test out our game logic once and then exit.
while True:
    input(f"Press 'Enter' to roll the die {username}!\n")

breakStep 2 Output:
Step 3: Simulate rolling dice
Simulate rolling a six-sided die and display the player’s and computer’s roll.
- Import the randint() function from Python’s built-in random module. This function allows us to generate random numbers, which we’ll use to “fake” rolling a six-sided die. Imports should always appear at the top of your file, before any other code.
from random import randint


welcome_message = """
    ...
"""- In the while loop, use the randint() function to generate a random number between 1 and 6. Store this number in a player_die_value and use an f-string to display the username and player_die_value.
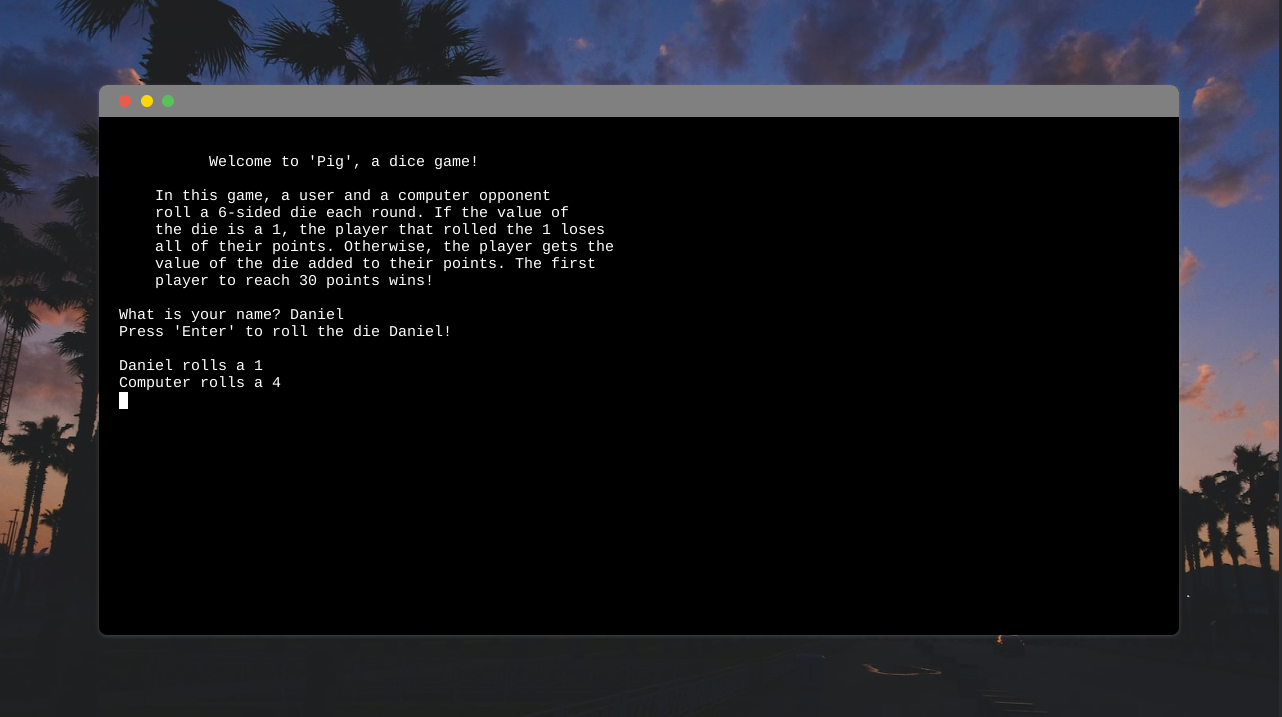
while True:
    input(f"Press 'Enter' to roll the die {username}!\n")

    player_die_value = randint(1, 6)
    print(f"{username} rolls a {player_die_value}")

break- Use the randint() function to generate another random number between 1 and 6. Store this number in a computer_die_value and use an f-string to display the computer_die_value. Note that the break statement still needs to be the last thing in the while loop.
while True:
    input(f"Press 'Enter' to roll the die {username}!\n")

    player_die_value = randint(1, 6)
    print(f"{username} rolls a {player_die_value}")

    computer_die_value = randint(1, 6)
    print(f"Computer rolls a {computer_die_value}")

    break
Step 3 Output:
Step 4: Create a function to update the scores of each player
Now, let’s calculate and track the player’s and computer’s score after each roll. We’ll create a function to determine whether each player gets points added to their score or gets their score reset to 0.
- Create two variables to hold the scores of our players: player_score and computer_score. Each variable should initially be set to 0 because our players start with no points.
player_score = 0
computer_score = 0

welcome_message = """
    ...
"""- Define a function at the top of your file called update_score(). It should take two parameters: score and die_value. We’ll use this function to return 0 if the die_value is 1 and the sum of the score and die_value for any other die_value. Function definitions always go at the top of your file, after any import statements.
from random import randint


def update_score(score, die_value):


player_score = 0
computer_score = 0- In the body of the update_score() function, add an if…else conditional statement. We’ll return 0 if the die_value is 1, and the sum of the score and die_value for any other case. The return statement lets us send a value out of a function that can be used by the function caller.
def update_score(score, die_value):

    if die_value == 1:
        return 0
    else:
        return score + die_value
- In the while loop, use update_score with the player and computer’s score and die values. Store the return values in player_score and computer_score variables.
while True:
    ...

    computer_die_value = randint(1, 6)
    print(f"Computer rolls a {computer_die_value}")

    player_score = update_score(player_score, player_die_value)
    computer_score = update_score(computer_score, computer_die_value)

break- Use the f-string syntax f”{variable_name=}” syntax to test that the player_score and computer_score take on the value you’d expect based on the die value of each player. That special syntax prints the variable name along with its value, and is a handy debugging tool when you’re developing a program and want to confirm a variable’s value! Note that the break statement still needs to be the last line of the while loop.
while True:
    ...

    player_score = update_score(player_score, player_die_value)
    computer_score = update_score(computer_score, computer_die_value)

    print(f"{player_score=}")
    print(f"{computer_score=}")

    break
Step 4 Output:

Step 5: Display a formatted scoreboard
In this step, we’ll make our game feel a bit more realistic by creating and displaying a scoreboard each round that holds the current score.
- At the top of your file, create a function called display_scoreboard() that takes two parameters: player_score and computer_score.
def update_score(score, die_value):
    ...

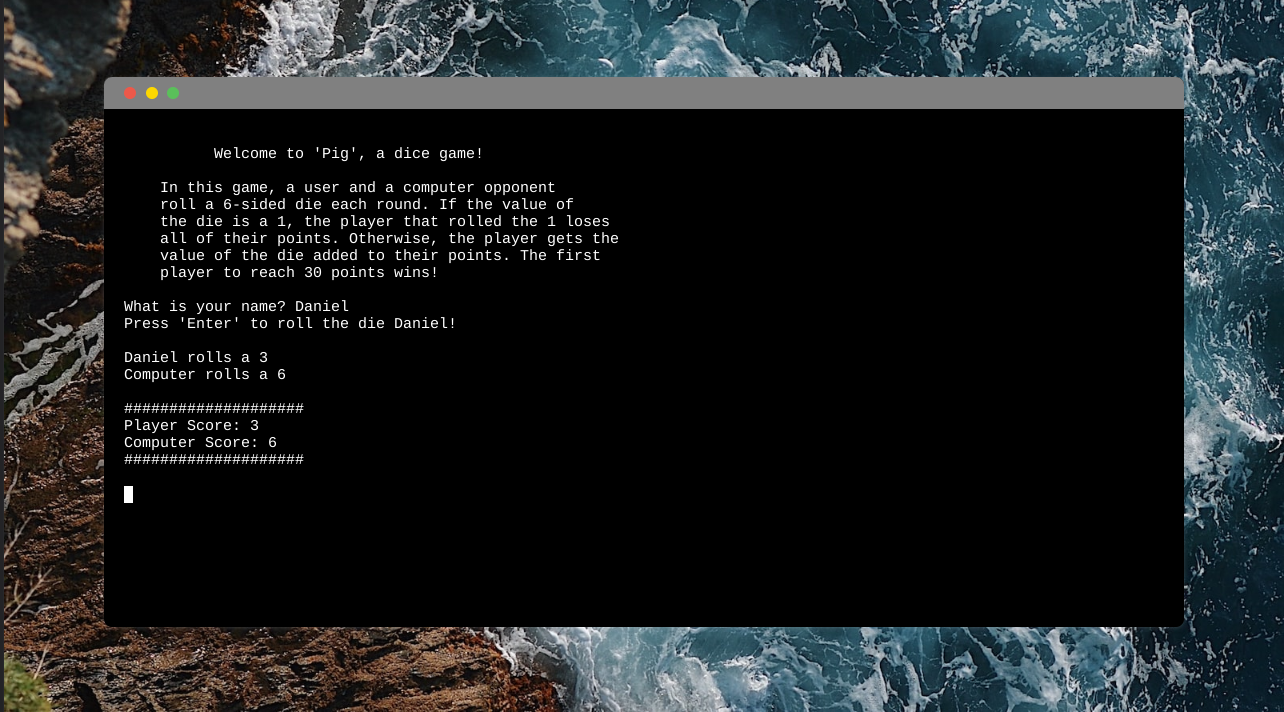
def display_scoreboard(player_score, computer_score):- In the body of the display_scoreboard() function, use print() statements to display a formatted scoreboard. Empty print() statements give us some newline padding between calls to display_scoreboard().
def display_scoreboard(player_score, computer_score):

    print()
    print("#" * 20)
    print(f"Player Score: {player_score}")
    print(f"Computer Score: {computer_score}")
    print("#" * 20)
print()- In the while loop, remove the print() statements that displayed the player_score and computer_score.
while True:
    ...

    player_score = update_score(player_score, player_die_value)
    computer_score = update_score(computer_score, computer_die_value)

    print(f"{player_score=}")    # Remove this!
    print(f"{computer_score=}")  # Remove this!

break- Use the display_scoreboard() function to display your formatted scoreboard. The break statement still needs to be the final statement in your while loop.
while True:
    ...

    player_score = update_score(player_score, player_die_value)
    computer_score = update_score(computer_score, computer_die_value)

    display_scoreboard(player_score, computer_score)

breakStep 5 Output:
Step 6: Determine the game winner
In the final step, we’ll check the scores of each player at the end of our game loop and determine who wins! The first player to reach 30 points is the winner.
- At the end of the while loop, remove the break statement.
while True:
    ...

    player_score = update_score(player_score, player_die_value)
    computer_score = update_score(computer_score, computer_die_value)

    display_scoreboard(player_score, computer_score)

break # Remove this!- Add an if…elif conditional statement to determine the winner. Each conditional body should display the respective winner and exit the while loop with a break statement.
while True:
    ...

    display_scoreboard(player_score, computer_score)

    if player_score >= 30:
        print(f"{username} wins!")
        break
    elif computer_score >= 30:
        print("Computer wins!")
        break
Step 6 Output:

Your game is complete!
Check out the finished project.
Download the project files and open main.py to view the completed project.
We’ve built a simple version together, but there’s plenty more you can do to customize and upgrade your version of “Pig”.
Download 1-Week Python Lesson Plans
Kids, ages 11-13, can start learning Python in a structured way. Download a FREE 1-week lesson plan with activities and slides. Enter your name and email to receive the free lesson plans in your inbox today.
If you want to build more games and apps in Python, join CodeWizardsHQ’s live coding classes for kids. It’s the most fun and effective way for kids to learn Python and advance to a real-world coding internship.
Students in our middle school and high school core track start by learning fundamental coding concepts in Python. They work with a live, expert instructor who supports them every step of the way. Classes are engaging and you’ll build personalized projects and applications in every lesson.
Enjoy this project!