Scratch is a fun and creative learning platform for kids who are curious about building games and applications. They can use their imagination to add and customize their projects.
In this tutorial, I’ll show you how to make a timer in Scratch. We will code a countdown timer and a stopwatch. You can add these timers to existing projects or your new project for a dynamic experience.
To learn Scratch with the experts, join our top-rated Scratch classes for kids.
What is Scratch?
Scratch is a drag-and-drop coding language that helps kids learn coding fundamentals as well as develop critical thinking, problem-solving, and logical reasoning skills.
It’s a coding playground that teaches kids in a hands-on and accessible way. It’s safe, fun, and completely free.
Scratch is easy to access through any browser and has a supportive community where students can share and remix projects and games. It’s one of the best ways, especially for young kids, to learn the foundations of programming.
What is a timer in Scratch?
Timers are a component of a program or game that measures time in specific intervals.
A timer can be used to delay actions, limit the duration of actions, or allow actions to continue for a total amount of time.
You can add a timer to count up or count down. Timers can be used in various projects, from simple games to complex animations. Each project may require a different type of timer.
In Scratch, timers are used to control the execution of command blocks or schedule actions to occur at specific intervals.
Timers require a trigger to start or stop. For example, your timer may start when the green flag is clicked and stop once it reaches a certain amount of time. Or maybe your timer starts with a new level and stops when the sprite is clicked.
Timers in Scratch can be created using custom variables or the built-in timer variable.
Custom variable
You can create a timer in Scratch by creating a custom variable to store the time.

Built-in variable
The timer variable is a feature in Scratch that records how many seconds have passed since the last time the green flag was clicked or the timer was reset.

Why add a timer?
Timers are a way to make your game or project more dynamic and engaging.
In a game, a timer can present a challenge. Let’s say you only have 5 minutes to complete a level, this helps structure the game and adds difficulty.
For apps, a timer may be used to track goals. Think of a running app where you track the number of miles you can in one day.
There are a variety of ways timers are useful in a project or game including:
- Scheduling actions
- Breaking down tasks
- Adding stakes
- Monitoring performance
Scheduling actions
Timers can schedule specific actions to happen at predetermined intervals, such as executing code or triggering an event.
Breaking down tasks
Timers help break down challenging tasks into smaller, more manageable chunks. This prevents users from getting overwhelmed and maintain a sense of progress.
Adding stakes
Timers add stakes to a game such as by making players lose if they run out of time. For example, players could try to get as many points as possible or solve a puzzle before the timer runs out.
Monitoring performance
Timers can be used to monitor the performance of code, such as measuring how long it takes to run.
How to Make a Countdown Timer in Scratch
A countdown timer starts at a certain number and counts down, usually ending at 0.
In our Flying Space Cat game, we can make the game more difficult (and fun!) by limiting the amount of time players have to accomplish the goal of collecting crystals.
Remix this project to add a timer to it. You can also try the full Flying Space Cat tutorial.
Let’s add a countdown timer to limit the players to 60 seconds.
- Start the timer
- Countdown every 1 second
- Add the next action
- Customize your timer
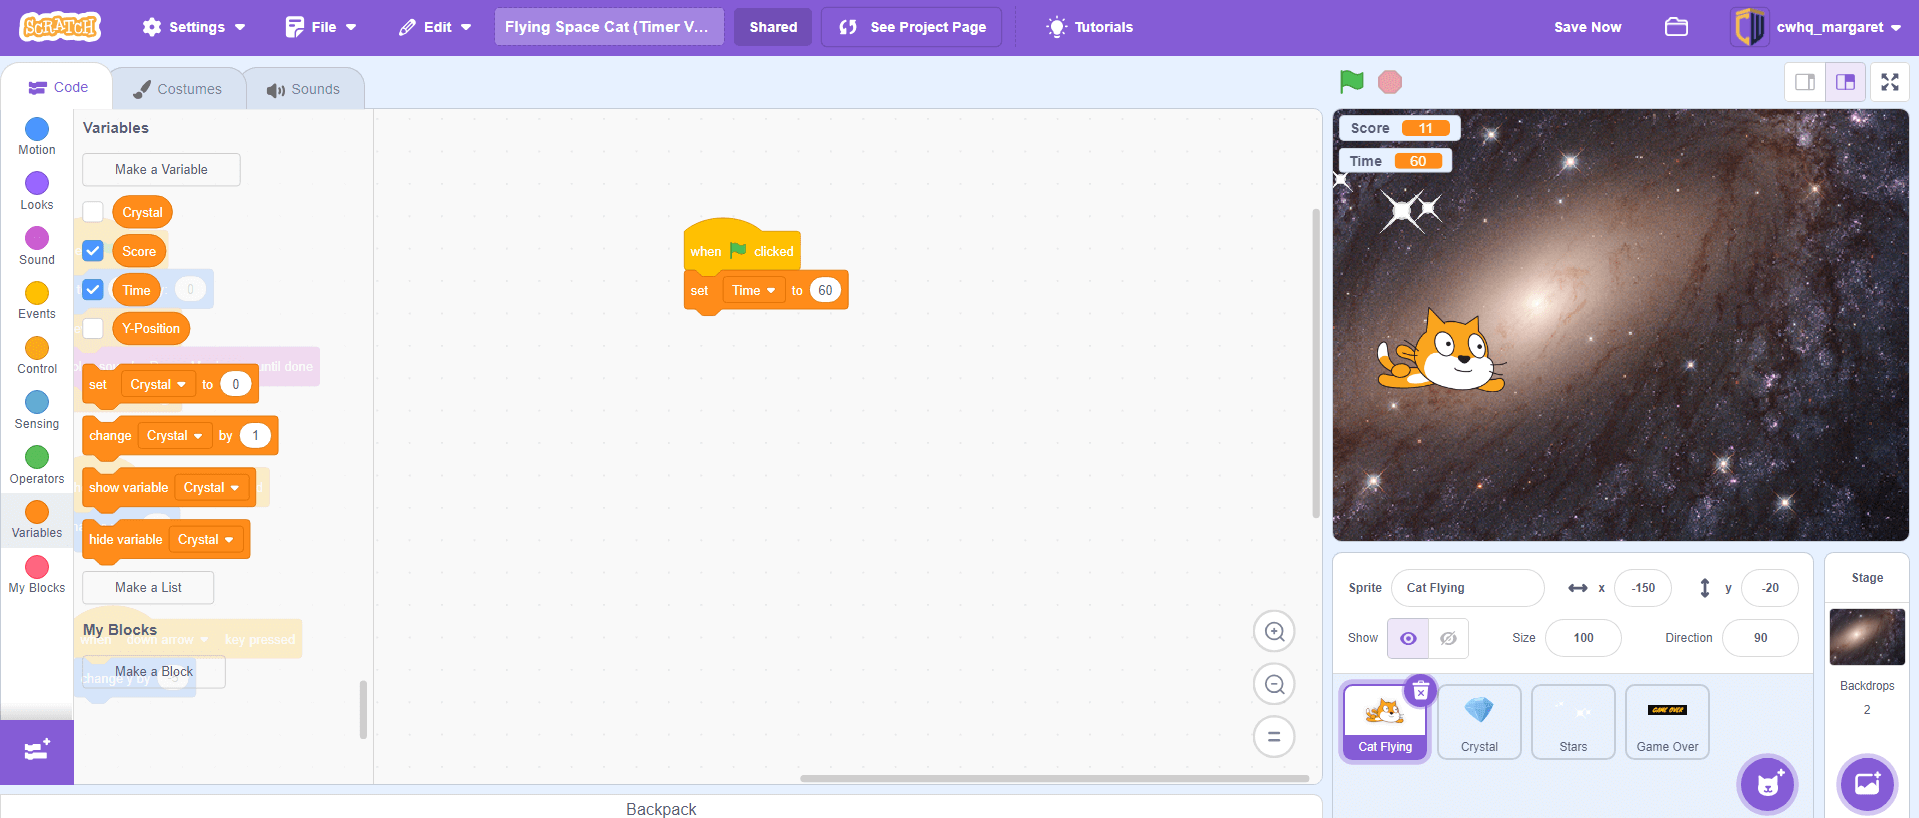
Step 1 Start the timer
We will set the timer to start when the game starts, when we click the green flag.
- Add a “When Green Flag Clicked” block to your sprite.

The time starts at 60 seconds. Since the time changes, use a variable to hold this value.
- In the variables blocks, make a variable called Time and check it off
- Under the “When Green Flag Clicked” block, add a set variable block. Update the dropdown to your Time variable and enter a number of seconds to start your timer. Here we are using 60.


Press the green flag to see the time displayed.
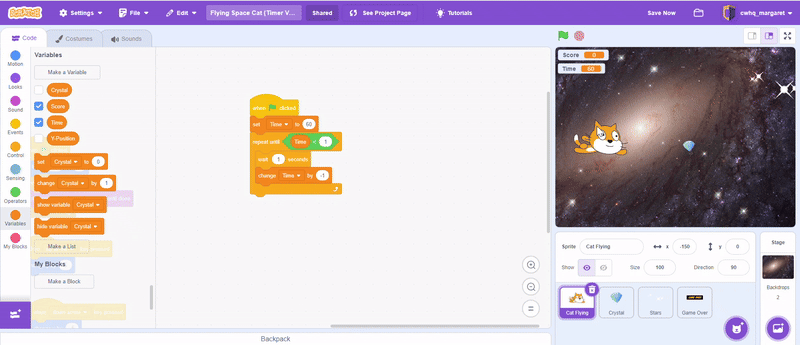
Step 2 Countdown every 1 second
Every second, the time decreases by 1 until it reaches 0. Then the game is over.
- Add a “repeat until” loop with an operator for “Time < 1”.
- Inside the loop, add a “wait 1 seconds” block
- Below that, add a “change Time by -1”

Click the green flag to watch your timer countdown!
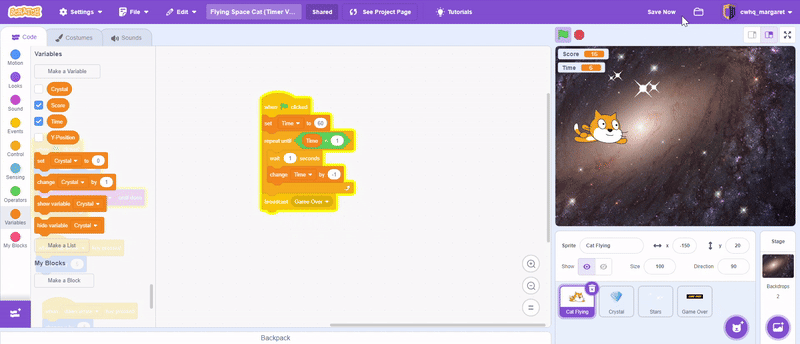
Step 3 Add the next action
When the time runs out, or reaches 0, the loop and the game ends.
Decide what happens when the time runs out. In our game, the “Game Over” message displays.
- After the loop, add a “Broadcast game over” block.


Run down the time to see the Game Over message.
Your timer is complete. See and remix the full game code here.
Step 4 Customize your timer
You can easily customize this timer by changing these features:
How long is the countdown?
Change the 60 in “Set Time to” block to another number.
What happens in your app after the time runs out?
Add that code beneath the “Repeat Until” block.
How fast does the timer countdown?
Change the time in “wait 1 seconds” and “change Time by -1” to countdown faster or slower.
How to Make a Stopwatch in Scratch
We can also create a stopwatch in Scratch. A stopwatch measures the time that has elapsed from when it’s started. It’s often used when we need precise time measurements like in a race where only seconds separate the winners and losers.
Scratch has a built-in timer variable that tracks to the microsecond how much time has passed since the last time the green flag was clicked or the timer was reset.
I’ll show you how to start and stop a timer here.
Add a Stopwatch To “A Unicorn Sighting”
You are hanging out at the beach and see an incredible sight, a white unicorn running across the beach! Build a timer to track how long your unicorn sighting is, it will be different every time. Start the timer when you see the unicorn and stop it when it disappears.
Remix this project to add a stopwatch to it. You can also see the completed A Unicorn Sighting.
Now, let’s add a stopwatch to track the time.
- Create a button sprite
- Set the stopwatch to 0 to start
- Change the button when it’s clicked
- Control the start and stop button
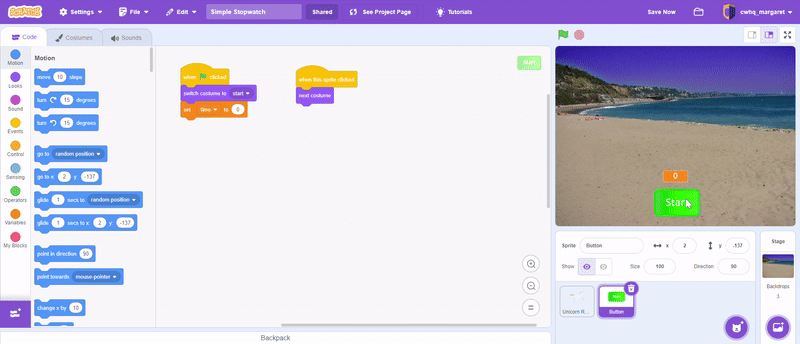
Step 1 Create a button sprite
We need one sprite, this is a start and stop button.
- Click the “Choose a Sprite” button. I’ve customized the Button2 sprite in the Scratch library.

- Create two costumes called start and stop.


You should see the button in your preview screen!
Step 2 Set the stopwatch to 0 to start
Add this code to your button sprite. We will set the stopwatch to 0 when the application is started.
- Add a “When Green Flag Clicked” block to your sprite.
Since the time changes, use a variable to hold this value.
- In the variables blocks, make a variable called time and check it off.

- On the preview screen, double-click the time display to show a large readout and move it near your button.
- Under the “When Green Flag Clicked” block, add a “set time to” block and use 0.
- Add “switch costume to” block and start with the Start button

Press the green flag to see the stopwatch set to “start” and time variable to 0. Make sure you are seeing the right button and time.

Step 3 Change the button when it’s clicked
When the start button is clicked, it will change to stop and vice versa.
- Control this with a “When this sprite clicked” block
- Change the costume using “next costume”

Try clicking on the sprite, the costume should change when you click it.
Step 4 Control the start and stop button
Now, we need to control the time using the start and stop buttons.
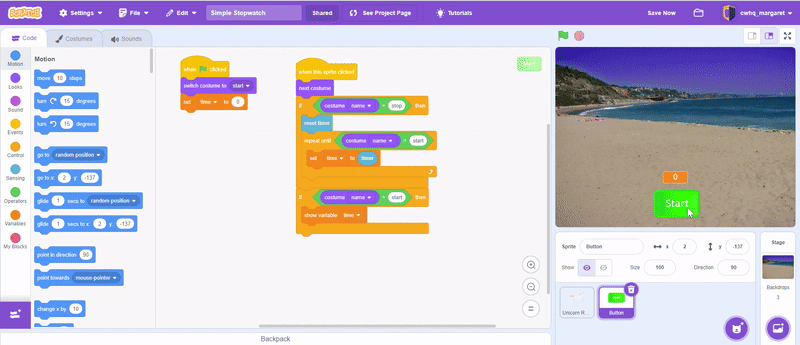
Create two if statements based on what the button is showing. The first if statement is when the start button is clicked.
- Add an if then block
- Use the condition “costume name” equals stop (remember this is the costume that shows after the button is clicked)
- Inside the if then, add a reset timer
- Use a repeat until loop with the condition “costume name” equals stop
- Inside the loop, set the time variable equal to the timer variable


The second if statement is when the stop button is clicked.
- Add an if then block
- Use the condition “costume name” equals start
- Inside the if then, show the variable time (this is the time when the button is pressed)


Click the start button and see if it works! Watch the unicorn run across the screen and capture the time.
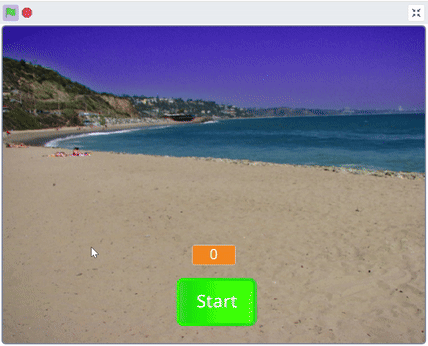
Now, you have a simple stopwatch to track the time.
Try creating your own stopwatch or adding one to your next project. There are plenty of ways to customize it and improve on this simple stopwatch.
Download Free Printable Scratch Coding Tutorials PDF
Try adding a timer to these Scratch games. Download a full PDF tutorial for the Rocketship Landing game and Flying Space Cat game.
Learn How to Make Games in Scratch
Making games in Scratch is a great way for kids to build a foundation in programming and also practice analytical thinking, computational thinking, problem-solving, and logical reasoning.
Kids, ages 8-10, who want to learn more about Scratch coding will love the live, online classes at CodeWizardsHQ. We offer a structured curriculum with project-based learning and expert instructors who support students every step of the way. Enroll today to get started.
They’ll build the coding fundamentals they need to move on to text-based programming in Python and JavaScript. It’s a complete coding program that provides everything your child needs to learn to code.
Learn to make games in Scratch in our top-rated coding classes for kids.