In this tutorial, I’m going to show you how to make a platformer game in Scratch. Scratch is a simple drag-and-drop coding language for children to learn basic programming skills. Kids can build all kinds of games and apps in Scratch.
With the Scratch classes I’ve taught, kids always enjoy the exceptional interactivity and enjoyment Scratch offers. In our Elementary School Core Track, students can craft their own interactive games while learning fundamental programming concepts like variables, loops, and more.
Try this tutorial to learn about accepting user input, adding player controls, checking for collisions between two sprites, and more. Let’s get started!
Play and remix the Chick’s Adventure game now.

What you need:
- Scratch account: Create a free Scratch account
No coding experience is necessary for this Scratch tutorial. Beginner-friendly for kids ages 8 and up. Give it a try!
How to Make a Platformer on Scratch
- Set up the Project
- Set the Scene
- Add Gravity to the sprite
- Add platforms for the sprite to jump on
- Add the user controls
- Change the levels
- Bonus: Make a way to win or lose
Step 1: Set up the Project
In this section, you will create a new Scratch project, give it a name, and save it so you can get started on your platformer game!
1. Login to Scratch
- Go to scratch.mit.edu and either login or sign up.
2. Create a New Scratch Project
- Once you are logged in, click the Create button at the top of the page.
3. Name the project and delete the Scratch cat
- In the top textbox on the Scratch editor, name your project whatever you would like!
- Then, delete the Scratch cat by clicking the trash can next to the sprite in the spite area.

4. Save the project
- Click File, then Save now. You’re now ready to make your platformer game!

Step 2: Set the Scene
For this section, you will add the backdrop and a sprite for the player to control, which will set the scene for your platformer game!
1. Add a backdrop to your game!
- Click on the Add a backdrop button on the bottom right-hand side of your editor.
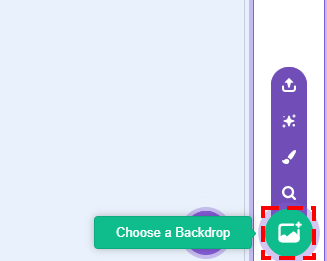
- Choose whatever backdrop you’d like! I chose Blue Sky 2 for my project. When you’re ready, click your chosen backdrop.

Great, now your backdrop should show up!
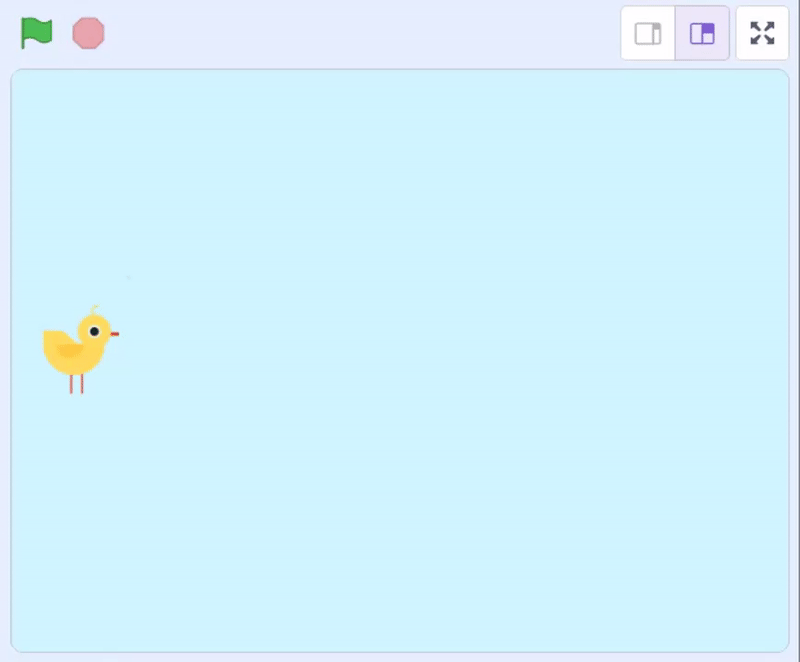
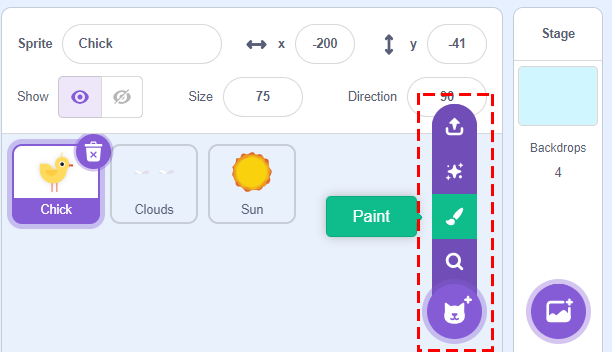
2. Select a Player Sprite
- On the bottom right-hand side of your page, click on the Choose a Backdrop button.
- Click any sprite you would like. In this tutorial, I decided to select the Chick sprite.
- You can change the size of the sprite if you’d like as well. Edit the Size textbox in the sprite area to do this!
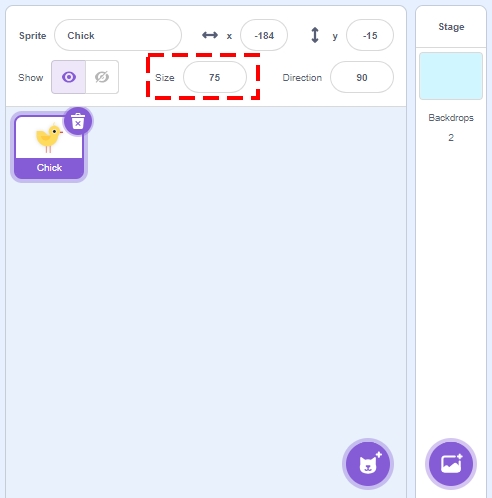
Awesome job, you should now have a sprite on your screen that is sized how you want. Click and drag the sprite around to move it to a new spot!
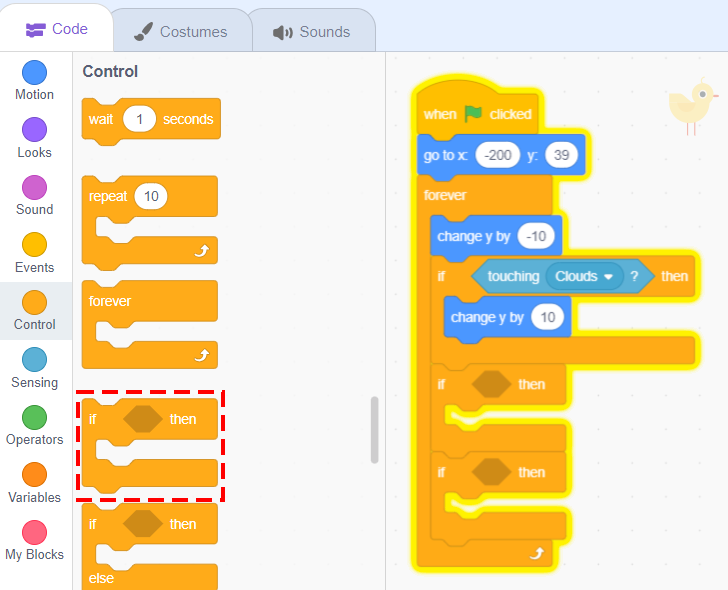
Step 3: Add Gravity to the Sprite
In this section, you will learn how to use multiple motion blocks to change the player’s position and move them downwards on a loop, which will simulate gravity.
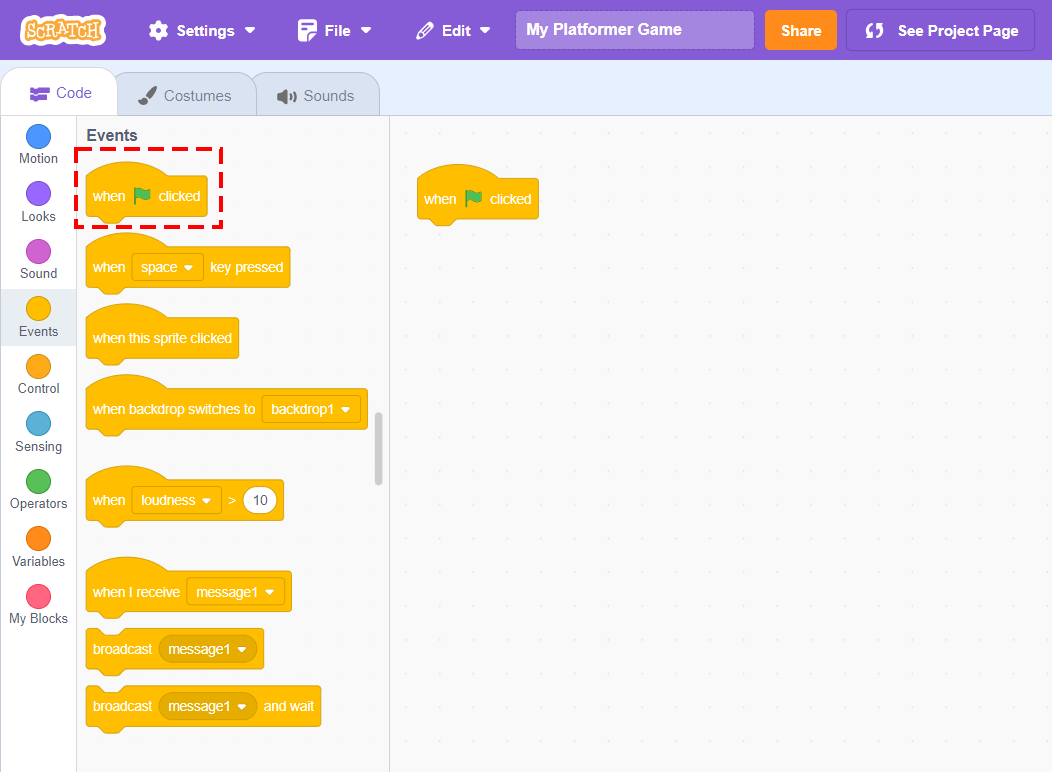
1. Detect when the game is being played
- In the Code block tab, click on the Events category.
- Then, select the When Green Flag clicked block and drag it into your code area.
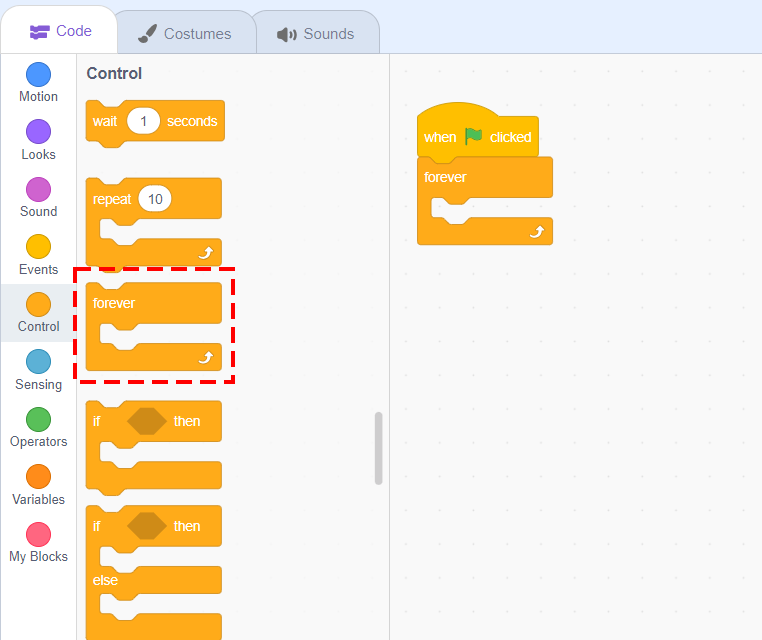
2. Make the sprite move downwards on a loop
- Go to the Control category and drag a forever block into the code area and attach it under the When green flag clicked block.
- Then, go to the Motion category and click and drag a change y by block. In the textbox, you can change the number if you’d like. The higher the number, the faster they fall.
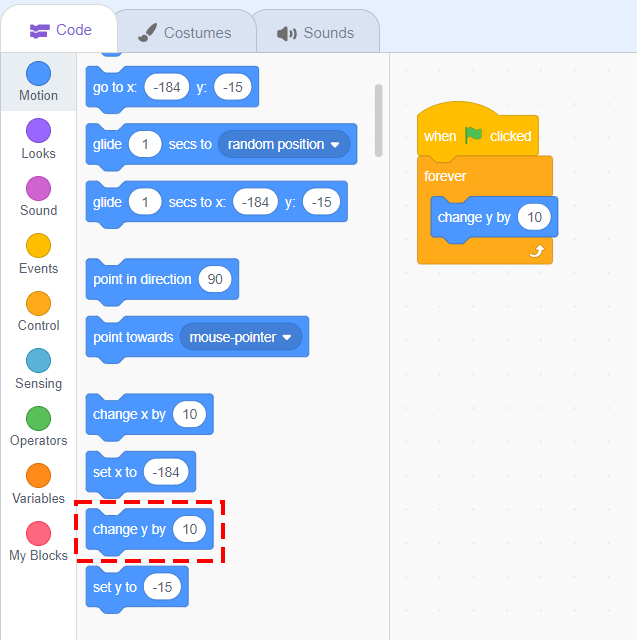
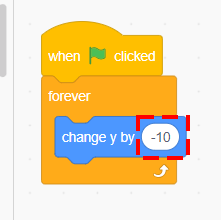
- Change the number in the change y by textbox to a negative number to make it go downwards.
3. Set the sprite’s initial position
- In the Motion category, click and drag a go to x and y block and connect it under the when green flag clicked block, but above the forever block.

- Press the Green Flag above the game area. Does your sprite fall? Every time you press the Green Flag, your sprite should start from the beginning and fall down!
Step 4: Add platforms for the sprite to jump on
In this section, you will add platforms for the player to jump on to avoid falling. Once the player touches a platform, you will make it so gravity turns off until they aren’t touching the platform anymore!
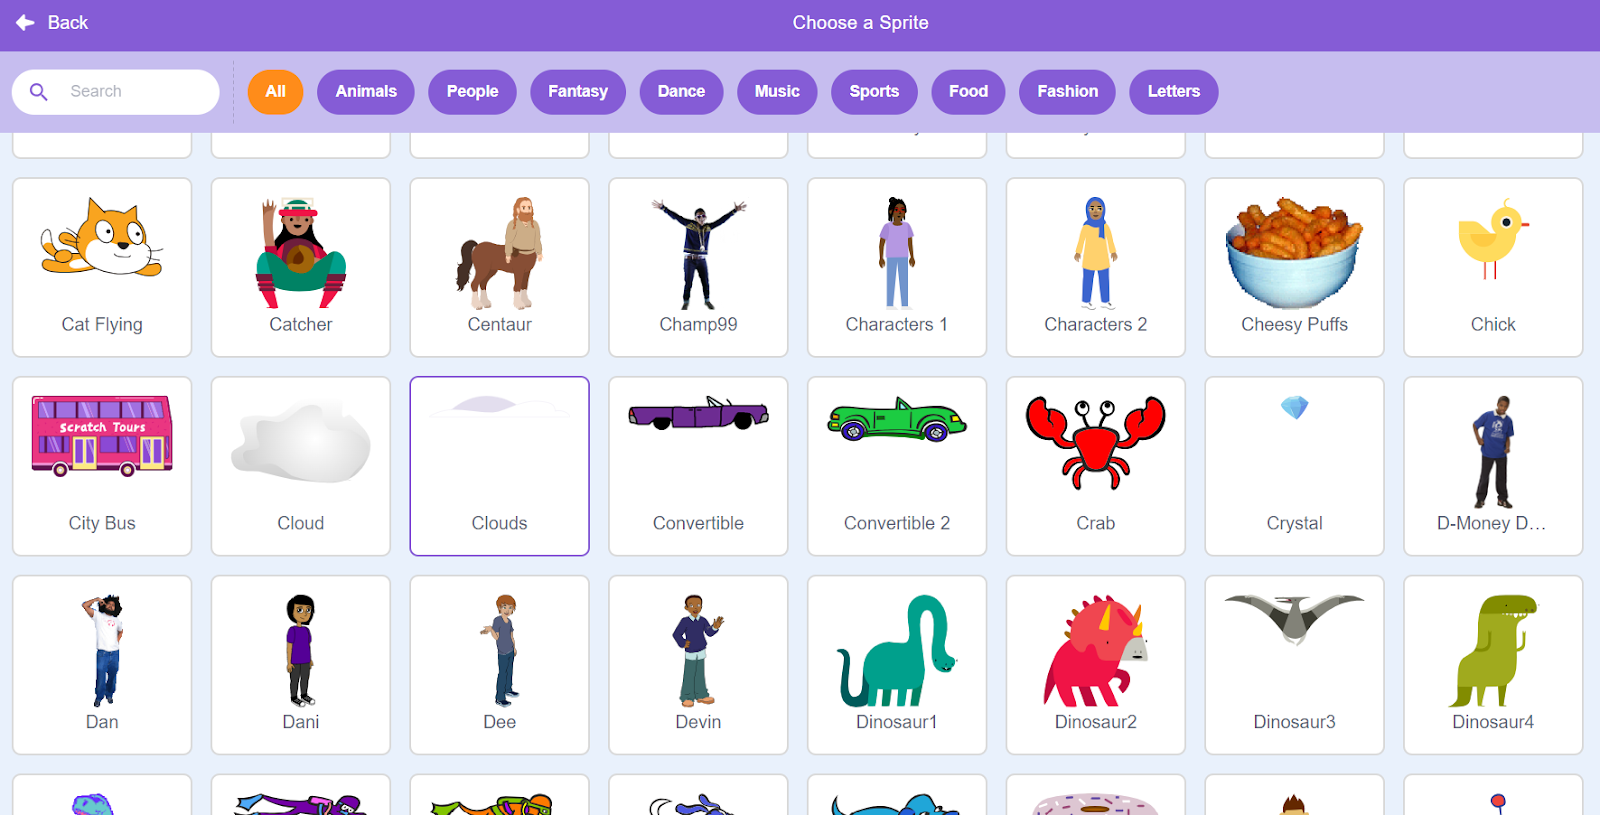
1. Add a platform for the sprite
- In the bottom-right corner of the Scratch editor, click Choose a Sprite.

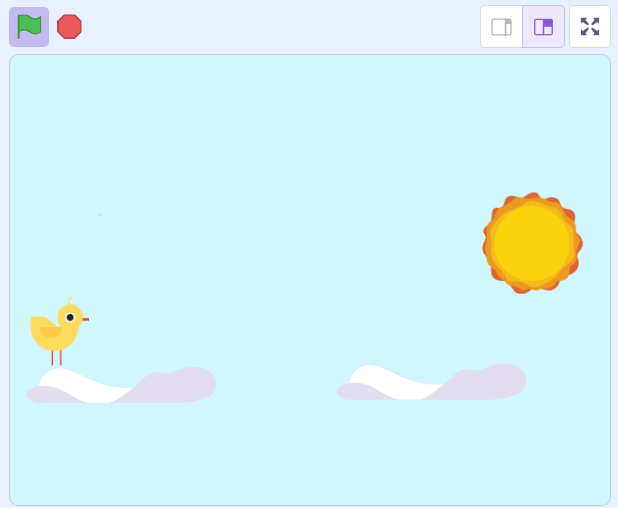
- Choose whatever sprite you want in the menu. For this tutorial, I chose the Clouds sprite.
- Move the new sprite to a position under the player’s sprite and press the Green Flag button. Does it work as intended?

2. Make it so the sprite can’t go through the platform
- Click on the Chick sprite. Make sure that it is selected before moving on to the next step.

- Then, in the Code tab, go to the Control category and click and drag an if then block to under the change y by block.

- Go to the Sensing category and drag a touching block into the code area. Click the block and change the dropdown selection to the sprite you recently added to the game. In my case, I selected the Clouds sprite.
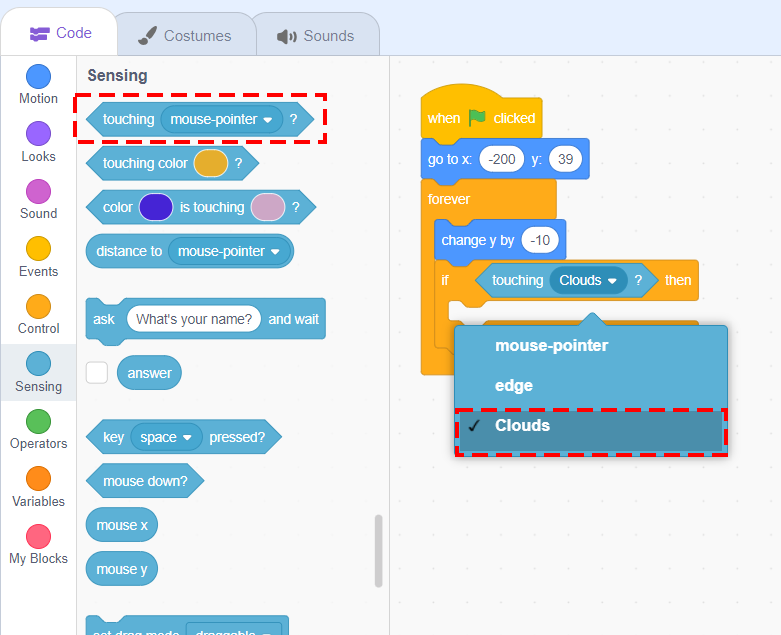
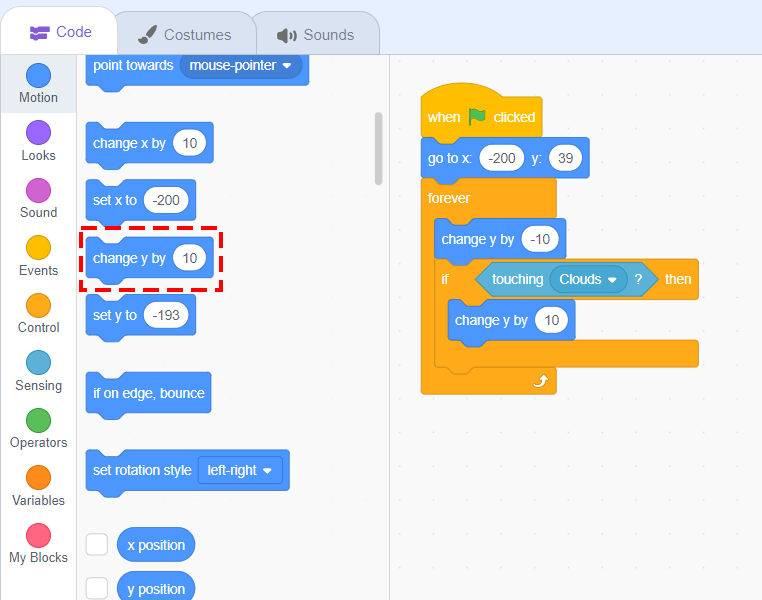
- In the Motion category, drag a change y by block to be in the if then block. Make sure that the number in the change y by block is the positive version of the one outside of the if then block. If you had a -10 in the first change y by block, you should have a 10 in the new one.
- Press the Green Flag button. Does your player sprite stop when it touches the platform?

Recommended: How to Make a Game on Scratch
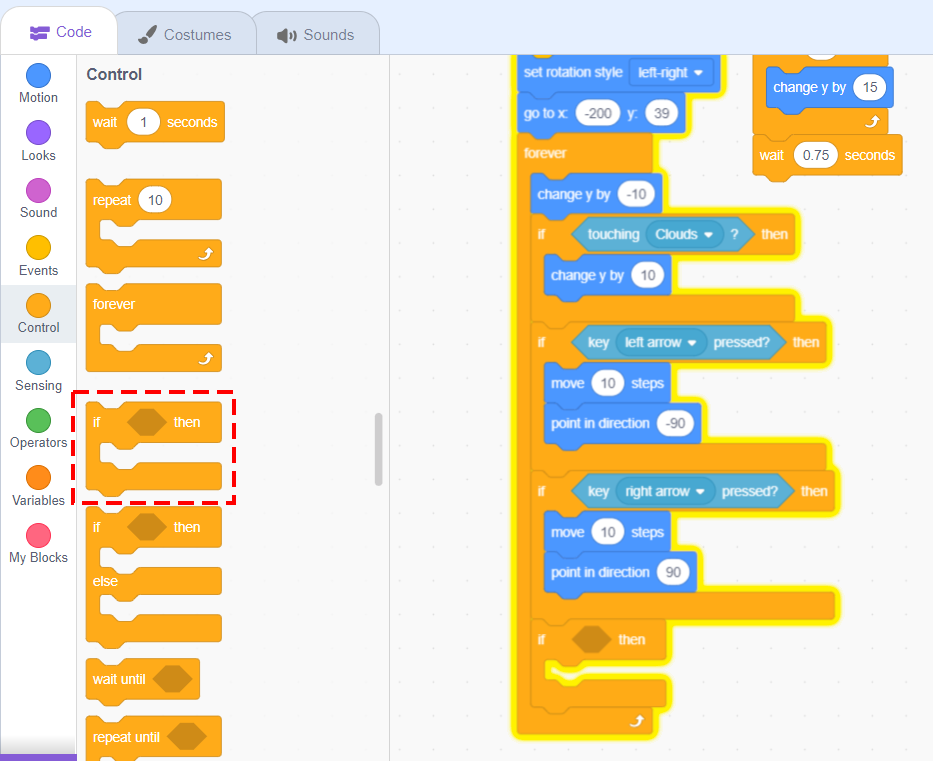
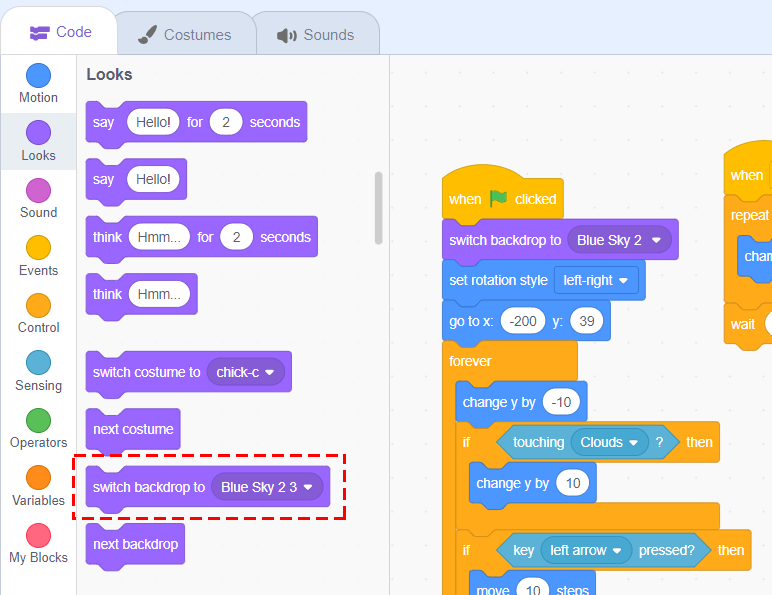
Step 5: Add the user controls
In this section, you will allow the player to move their sprite back and forth in the game, which will make it so they can eventually switch levels. You will also make it so the player can jump from platform to platform!
1. Allow the player to move left or right
- In the Control category, drag two if then blocks to inside the forever block.
- Then, go to the Sensing category and drag two key pressed blocks into the if then blocks you added. Change one of them to left arrow and the other to right arrow in their dropdowns.

- Go to the Motion category and drag two move steps blocks into the left and right arrow key pressed blocks. Keep them both the same number.
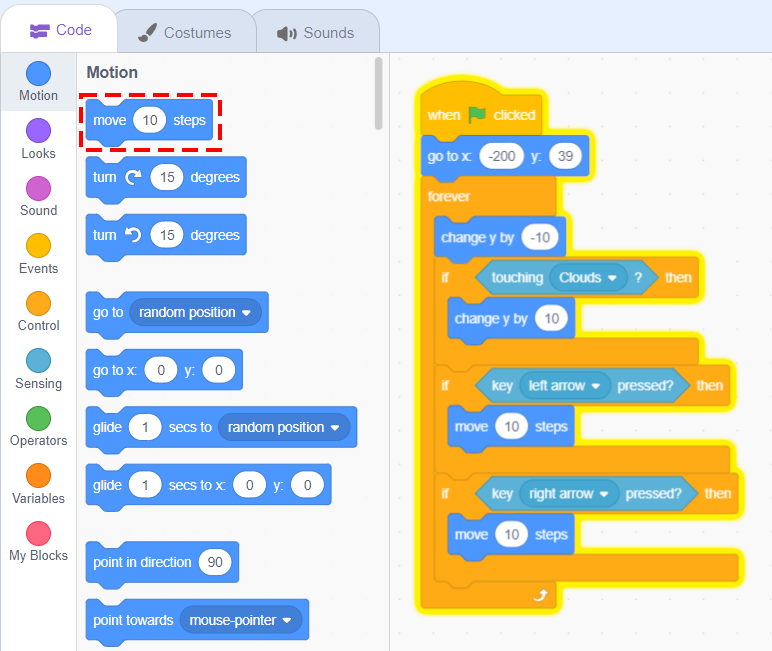
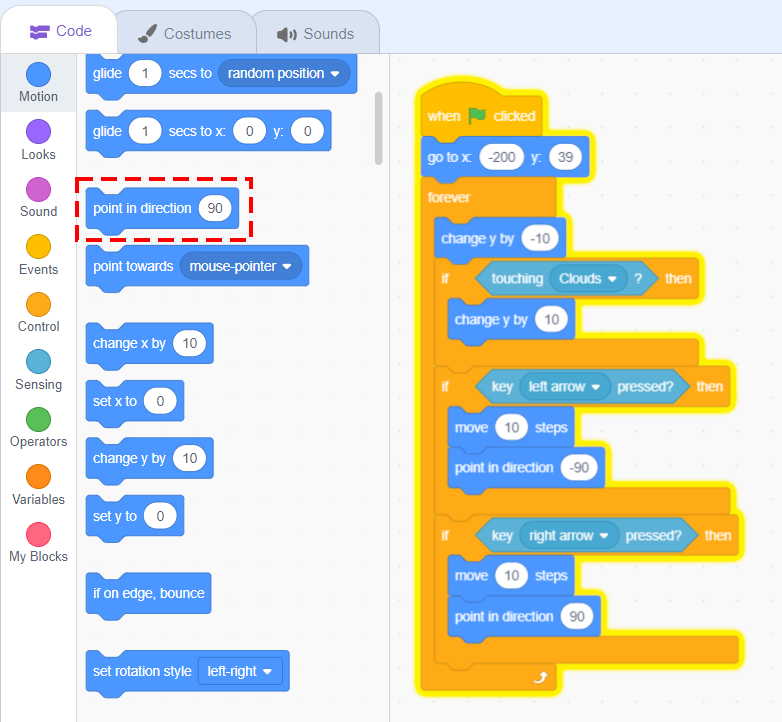
- Next, in the Motion category, drag a point in direction block into both the key pressed blocks. Then, change the number in the left arrow key pressed block to -90. The right arrow one should be 90.
- In the Motion category again, drag a set rotation style block to under the Green Flag clicked block.
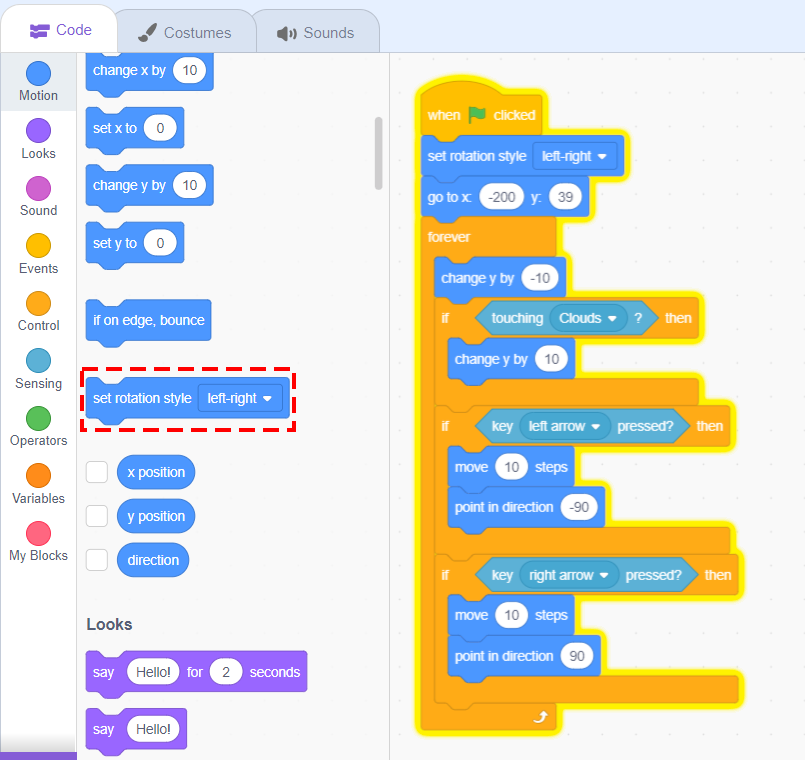
Great work so far! Does your sprite move back and forth with the left and right arrow keys?
2. Make the player jump
- Go to the Events category and drag a when key pressed block into the code area. Change the dropdown in that block to up arrow or spacebar.

- Then, in the Control category, drag a repeat block under the when key pressed block.

- Get a change y by block from the Control category and place it in the repeat block. Change the number in the change y by block to be about 15, or a number bigger than the gravity number.
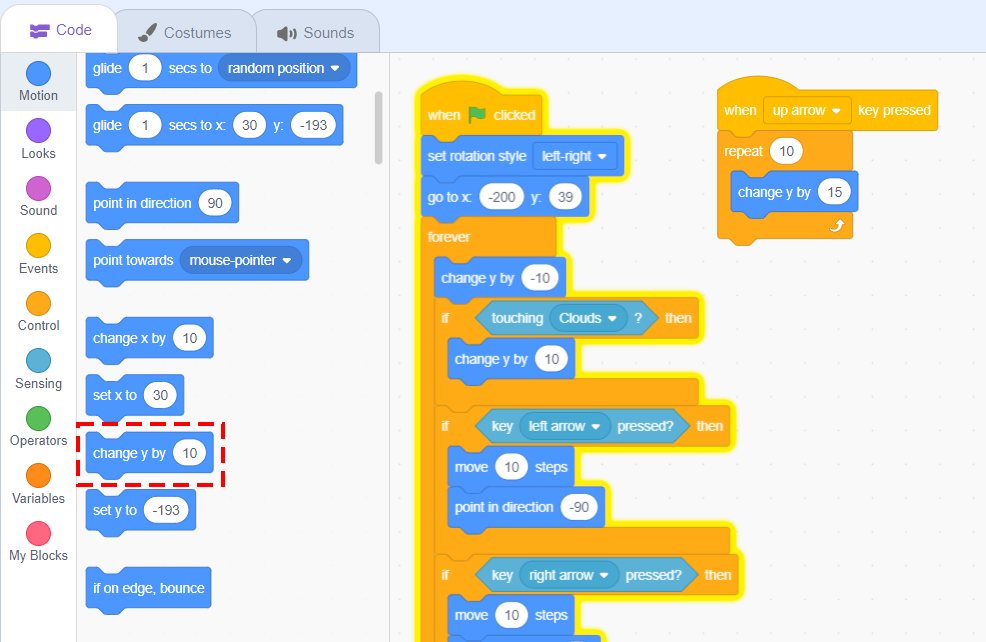
- To add a delay between jumps, go to the Control category and drag a wait block under the repeat block.
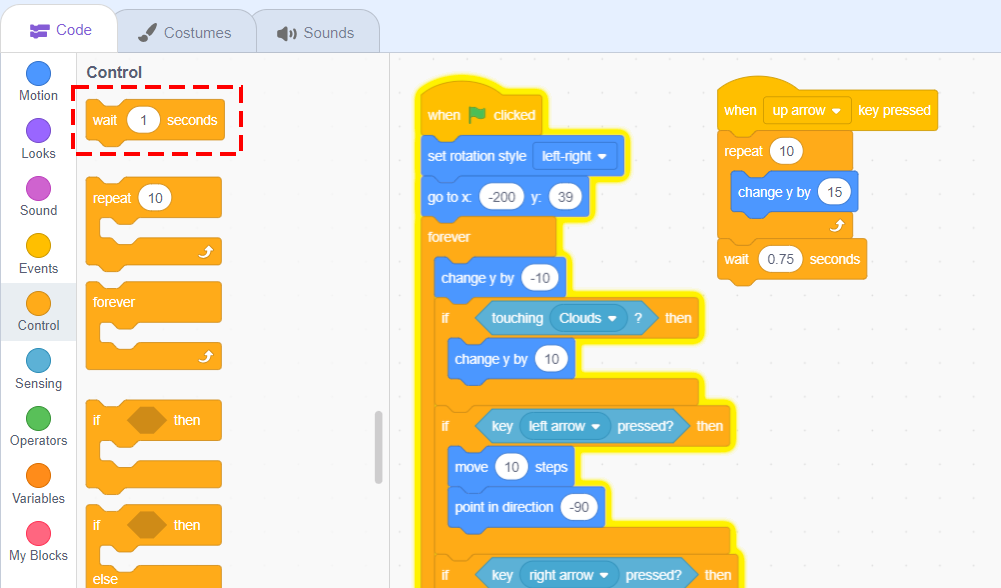
- Press the Green Flag button, does the sprite jump when you press the up or spacebar key?

Step 6: Change the levels
In this section, you will create a checkpoint that the player must touch to switch to the next level. You will be able to use your creativity to develop multiple levels using this method.
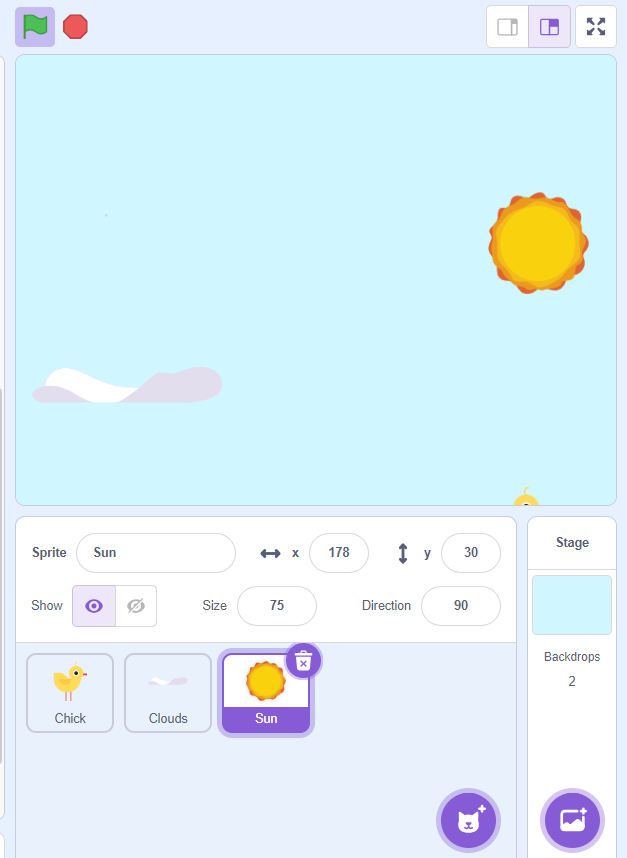
1. Add a checkpoint
- Choose another sprite to serve as a checkpoint the player has to get to in order to get to the next level. For my project, I chose a Sun sprite. Feel free to change the size of the sprite as well.
2. Change levels when the checkpoint is touched
- Go to your Code tab and select My Blocks. Then, click the Make a Block button.

- There will be a popup. In that window, change the name in the textbox to Next Level. Then, click the Ok button.

- You will notice a define block in your code area now. This is called a function, and basically is a small segment of code that performs an action. We will use it to change levels!
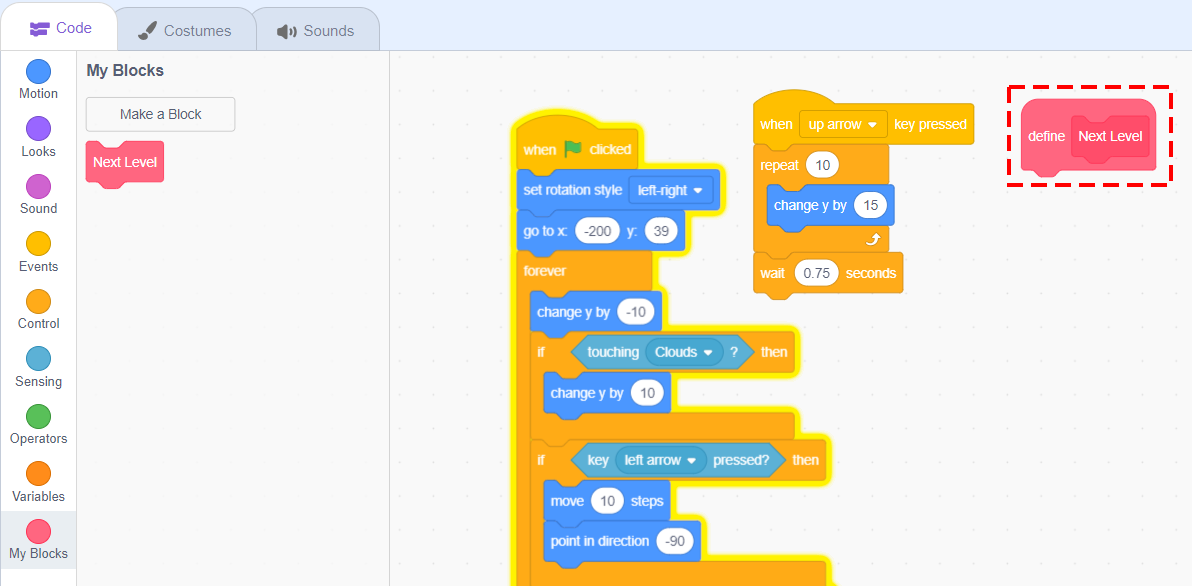
- Then, attach a go to x and y block to the define block. Make sure the x and y values are similar to the ones you originally created in the when green flag clicked block.
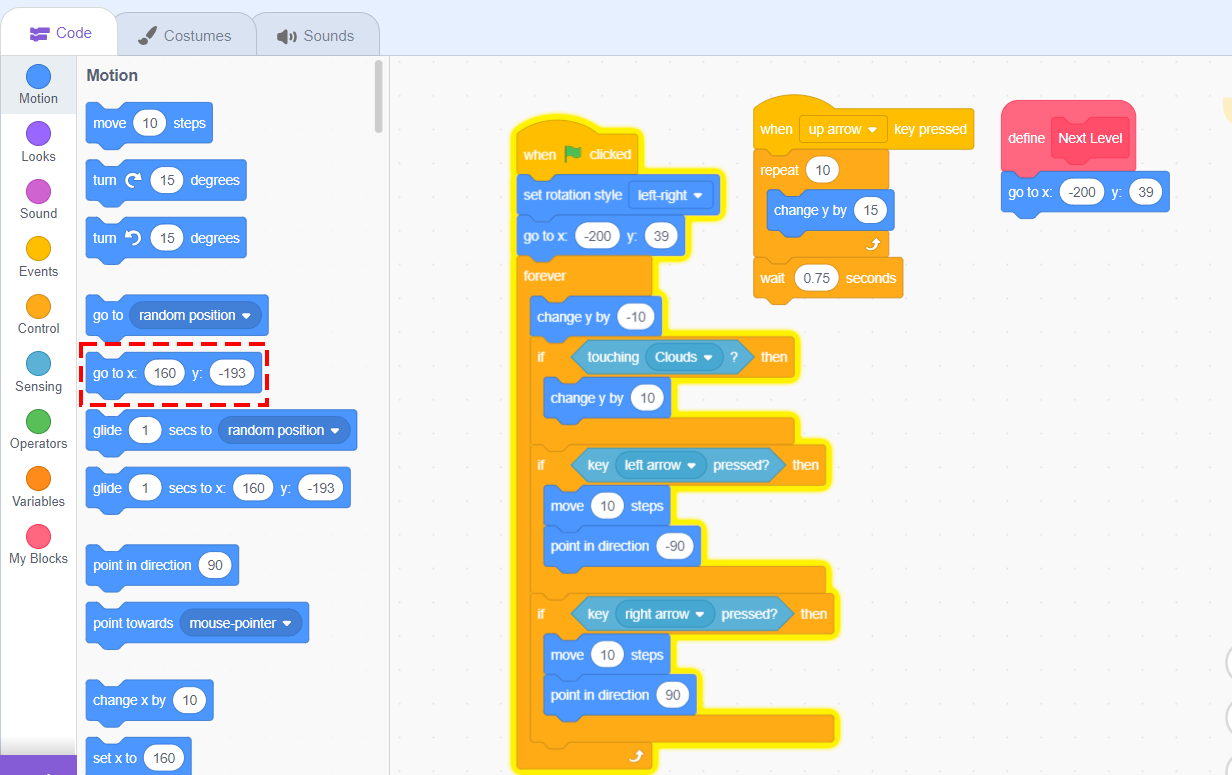
- Next, in the Events category, click and drag a broadcast block in to the define block as well. In the text portion, change it to something like Next Level.

- Click on the checkpoint image in the sprites list area on the right of the page to make sure you’re changing the correct sprite. Then, in the Events category, move a when I receive block to the code area. It should say When I receive Next Level.

- Then, from the Looks category, drag a next costume block under the when I receive block.

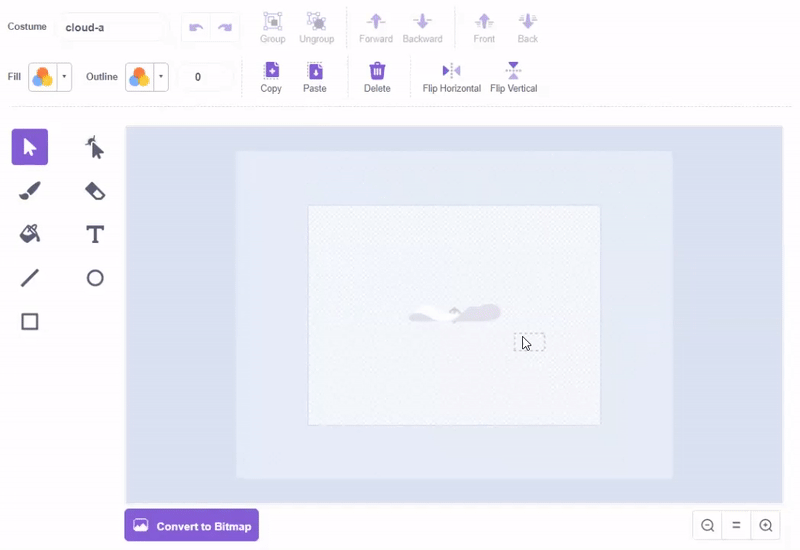
- Then, click on the Costumes tab for your platform. You can click the Zoom out button – shaped like a magnifying glass with a minus on it, which is situated in the bottom right corner of the picture editor. This allows you to edit more of the image all at once.
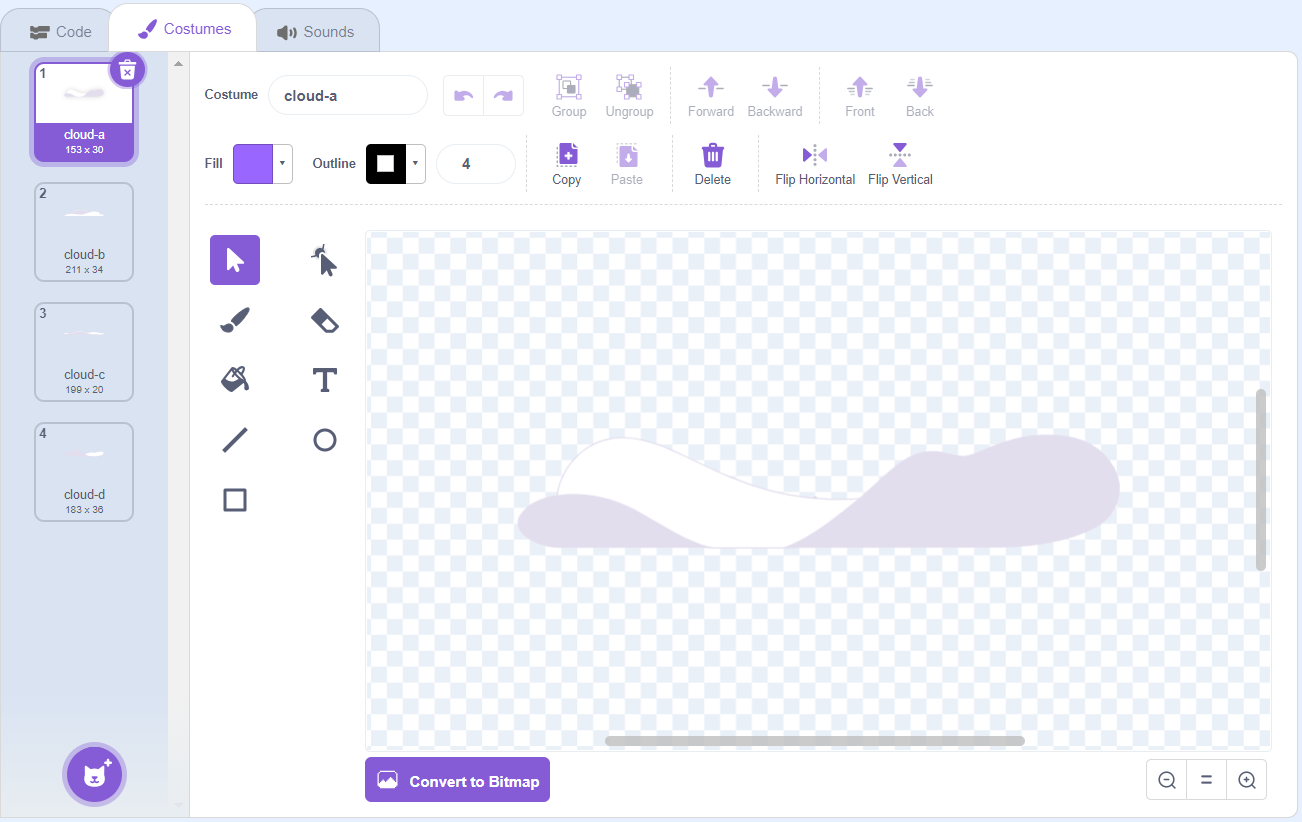
- Create another platform for the player to jump on by clicking and dragging to select the whole drawing. Then, click the Copy and the Paste buttons, and drag the new one to a better position.
- You should now have two platforms to jump on!
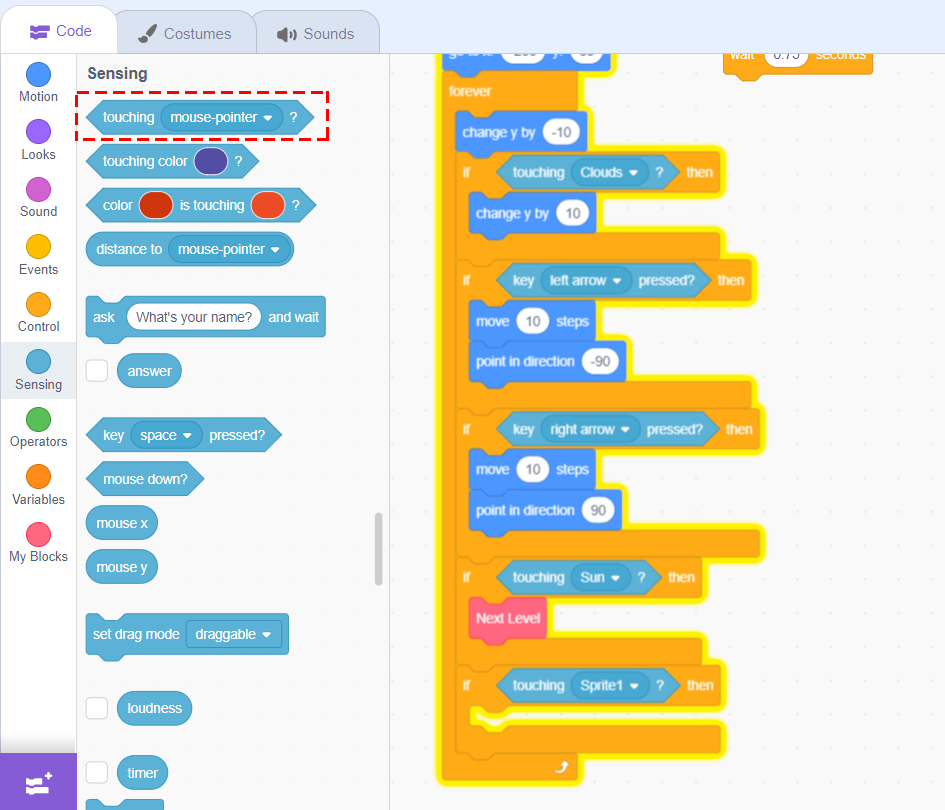
- Next, get an if then block from the Control category and drag it under the if right arrow pressed block.
- Then, find a touching block from the Sensing category and put it in that newly added if then block.

- Go back to the My Blocks category and click and drag the Next Level block into that if then block.

- Click on the Platform sprite again. From the Events category, add a when green flag clicked. Then, go to the Looks category and put a switch costume to block to reset the platforms whenever the game is started.

Nice job! Do the platforms switch? From here, you can adjust each costume to make new levels.

Bonus Step: Make a way to win or lose
In this bonus section, you will make a way for the player to win by reaching a certain level, or lose by falling from the platforms! You will also create win and lose game screens for when this happens.
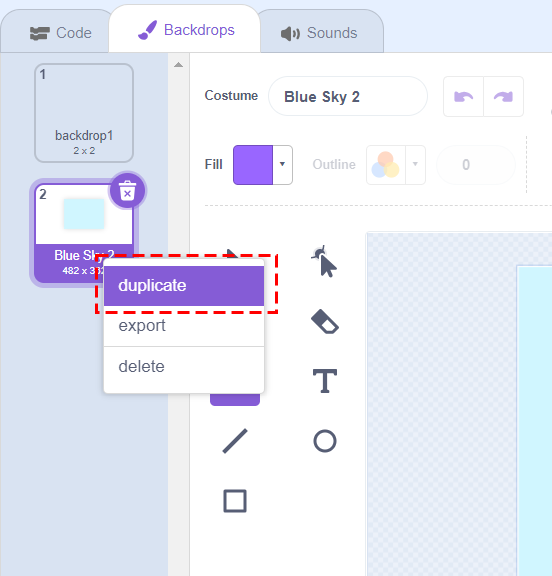
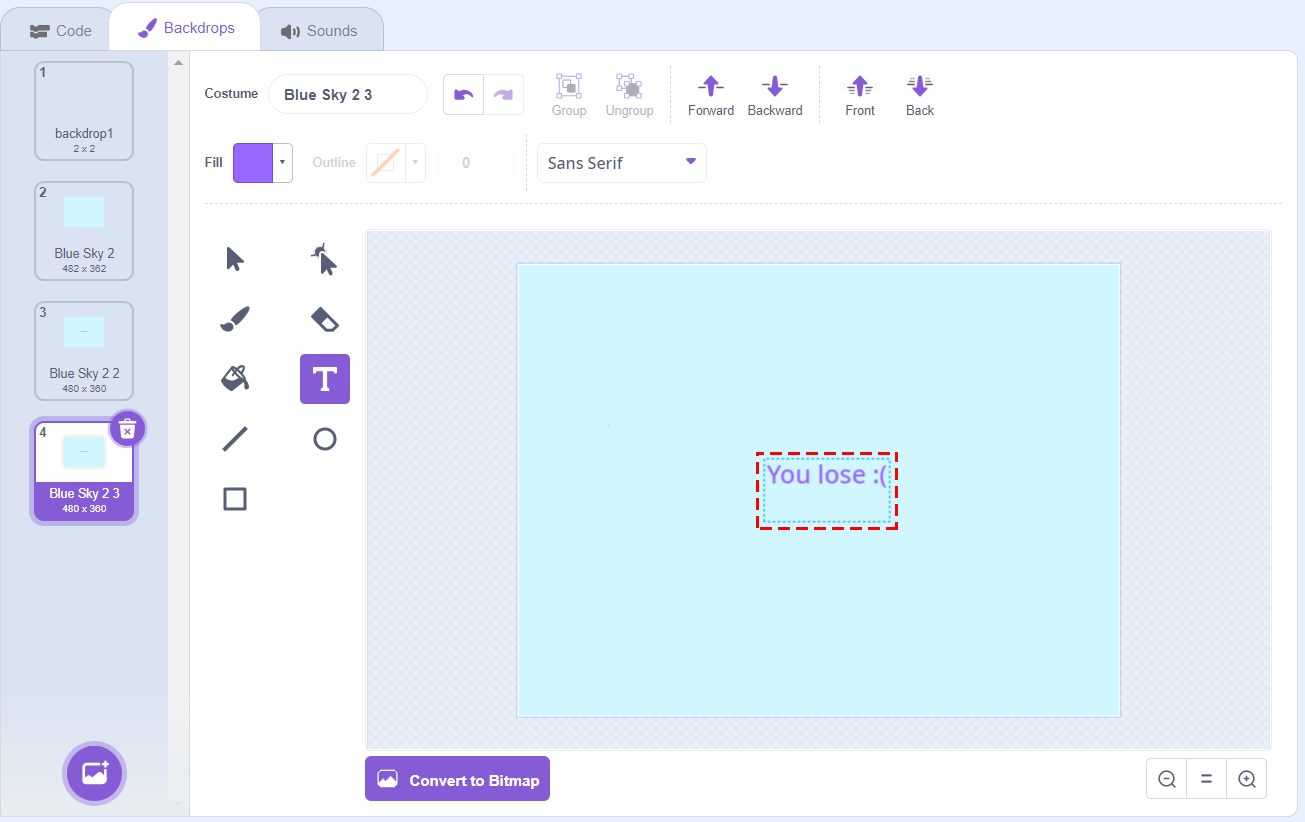
1. Create the win and lose backdrops
- First, click on the Backdrops section on the bottom right of the editor in the Stage menu.

- Once you do that, click on the Backdrops tab. Then, right-click on the backdrop you’re using in this project. Click duplicate to make an exact copy.
- When you’re in the new backdrop, click on the Text button in the menu. Edit the text to say something like You Win!
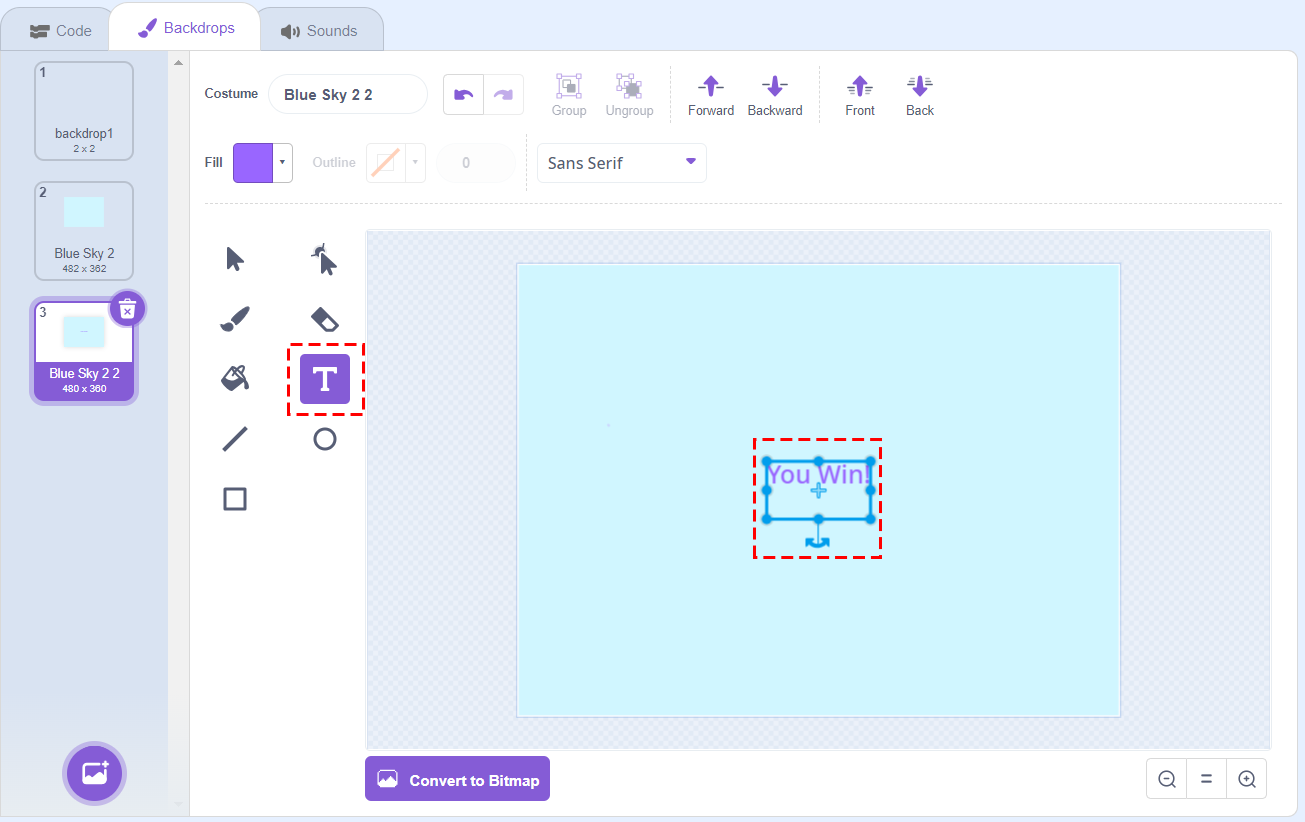
- Next, right-click and duplicate that new backdrop with the text as well.

- Click the text and edit it to say something like You lose. Now you should have both the win and lose backdrops in your game!
2. Make the player lose if they fall off the platform
- First, click on the player’s sprite. Then, go to the Looks category and get a switch backdrop to block and drag it under the when green flag clicked block. Make sure to set the backdrop to the first backdrop – not the win or lose ones. This is so that it resets whenever the player starts the game again.
- Then, select Paint a new sprite.
- In the Costumes tab of the new sprite, make a rectangle that is positioned at the bottom of the game screen. We’ll make it so that when the player touches this, they lose.

- Then, go to the Code tab again and drag an if then block in the main forever block loop.

- Next, go to the Sensing category and get a touching block and move it into the condition of the if then block you just added. Change the dropdown selection to the new sprite you created.
- Now, go to the Looks category, get a switch backdrop to block, and change the dropdown selection to the lose backdrop.

- Finally, go to the Control category and get a stop all block. Place it under the switch backdrop to block.

Does the lose screen display when the player falls off a platform?

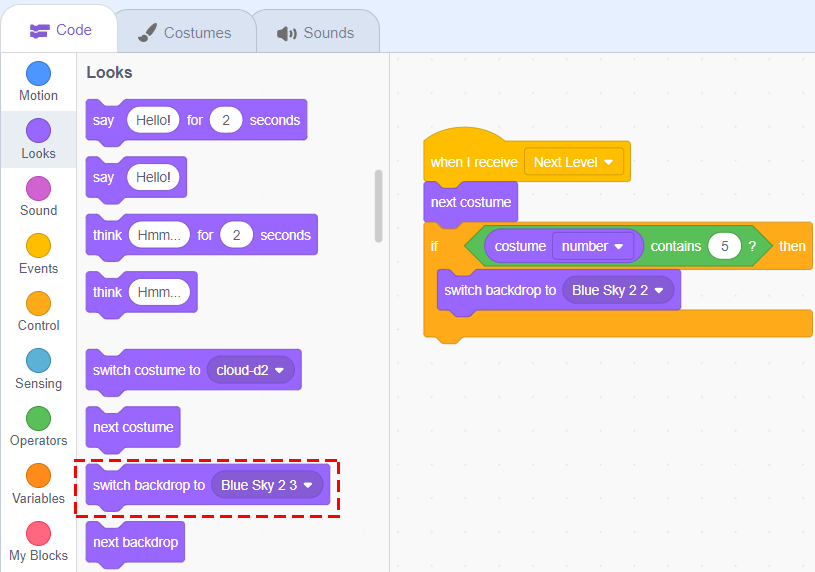
3. Make the player win if they beat the last level
- Select the platform sprite. Then, go to the Control category and place an if then block under the next costume block.

- Then, go to the Operators category and grab a contains block. Put that in the if then block.

- Go to the Looks category and put a costume number block in the left textbox of the contains block.

- Finally, go to the Looks category and get a switch backdrop to block and put it in the if then block. Make sure it goes to the You Win backdrop.
Test your game, can you win?

Check Out Our Other Scratch Tutorials
Keep coding with one of these fun Scratch tutorials!
- How to Make a Flappy Bird Game – Make an interactive game where the player must make a bird flap its wings to avoid incoming obstacles!
- Flying Space Cat – Assist Space Cat in its space exploration mission by developing an enjoyable crystal-collecting game using the Scratch programming platform.
- Code a Rocket Landing Game – Finish this Scratch programming tutorial designed for children and create a game where you safely land a rocket.
- Valentines Day Card Scratcher – Create a Valentine’s Day scratch-off card with a personal touch by following this easy-to-follow Scratch programming tutorial.
- Holidays Advent Calendar – Use Scratch to program a customized Advent Calendar for the holiday season and gradually unveil presents, treats, or activities to share with your friends adn family.
- Halloween Candy Collector Game – Follow this simple Scratch programming tutorial and create a personalized game where you collect candies on Halloween.
Download Free Printable Scratch Coding Tutorials PDF
Get the Rocketship Landing game and Flying Space Cat Scratch tutorials in a printable format.
Try a Scratch Coding Class for Kids
At CodeWizardsHQ, we believe that learning about technology and programming during a student’s formative years can pave the way for future success. Our specialized program tailored for elementary school children utilizes Scratch as a foundational tool for imparting coding skills.
In our inaugural course, Animation and Games with Scratch, young learners delve into crucial programming concepts such as variables, loops, and conditionals. Upon completing this course, they will possess the proficiency to craft their own games and animations through Scratch, thus equipping them for more advanced coding endeavors and a promising future in the realm of technology. Our program fosters the development of children’s skills and imagination, all while ensuring an enjoyable and educational experience.