Hey there, young explorers! Ready to learn how to make a jumping game on Scratch? We’re building a Rocket Jump game where you’ll zoom through space going from platform to platform. Before we start building our game, let’s talk about Scratch. Scratch is a super cool place where you can make your own stories, games, and animations — like a digital LEGO set that’s all about your ideas!
It’s like learning to speak the language of computers! And the best part? You don’t have to type any words or numbers. Instead, you snap together colorful blocks that look a bit like puzzle pieces. Each block is a command that tells your characters and objects what to do.
In our elementary school curriculum, students start their coding journey with Scratch. As kids build games and animations with Scratch, they’re laying the groundwork for computational thinking—a vital skill set for coding with actual code.
Let’s start our coding journey together!
Complete this tutorial to create a jumping game on Scratch.
Play and remix the Rocket Jump game now.
What you need:
- Scratch account: Create a free Scratch account
No coding experience is necessary for the Rocket Jump tutorial. Beginner-friendly for kids ages 8 and up. Give it a try!
Steps to make a jumping game in Scratch:
- Step 1: Setup the scratch project
- Step 2: Make the rocket move with keyboard keys
- Step 3: Add “gravity” to make the rocket fall.
- Step 4: Add the platform
- Step 5: Make the rocket jump when touching the platform.
- Step 6: Change platform position everytime rocket touches it.
- Step 7: Add scores in the game.
- Bonus 1: Change costumes of the Rocketship sprite
- Bonus 2: Increase difficulty as the game progresses
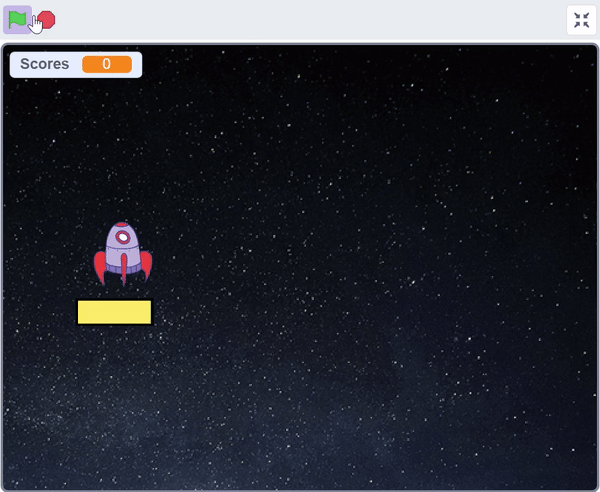
In this game, players guide a rocketship through the starry cosmos using the arrow keys to navigate left and right. The rocket automatically falls due to gravity, but upon touching the platform, it jumps upwards to earn points. Each successful landing on the platform boosts the rocket higher and changes the platform’s position, making each jump a new challenge. The aim is to keep the rocket aloft as long as possible while racking up jumps for a high score.
Step 1: Setup the Scratch project
Create a New Scratch Project
- Open Scratch, and you’ll see a button that says “Create”. Click it, and you’re on your way!
- At the top, you’ll find the name “Untitled”. Click on it and type in “Rocket Jump” to name your game.
Set the Stage
- Every game needs a background. Look at the bottom-right corner for a little picture that looks like mountains. That’s the backdrop. Click it!
- Choose a backdrop with stars to make it look like outer space. You can pick one or even draw your own.

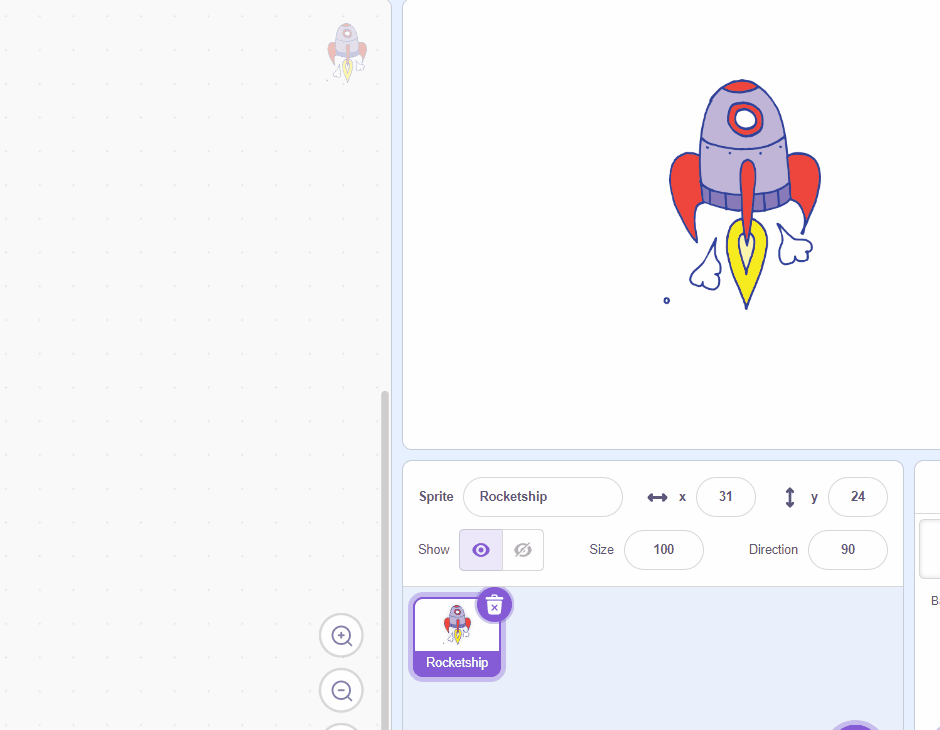
- Next, click on the picture of the cat to select a sprite. You can pick a rocket from the ones they have.

- Set its size as per your need. For rocket sprite, a size of 40 works the best.
After we have both backdrop and sprite setup, you should have something like below in the game preview area:

Step 2: Make the rocket move with keyboard keys
Moving Right
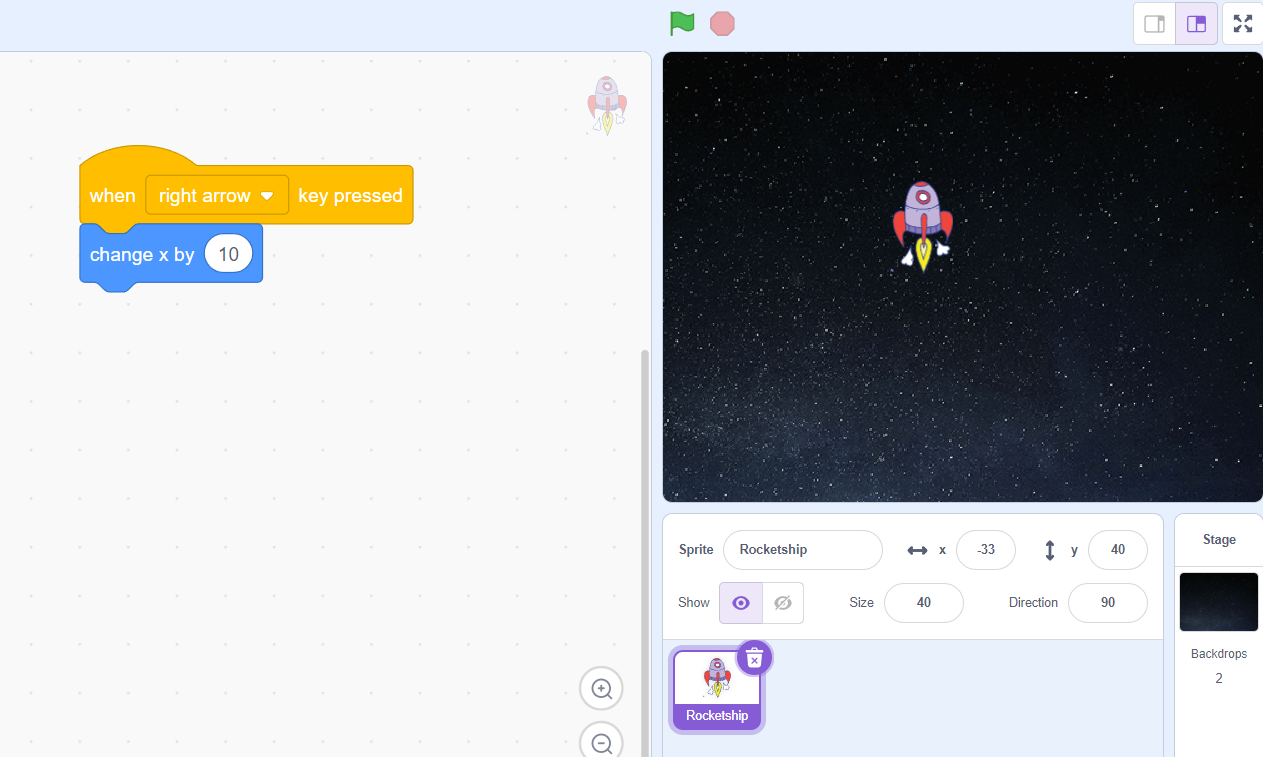
- Let’s get our rocket moving. Click on the Events category, and you’ll find a block that says “when space key pressed”. Drag it out.
- We want to move right when we press the right arrow, so click on the little dropdown arrow on that block and choose the “right arrow”.
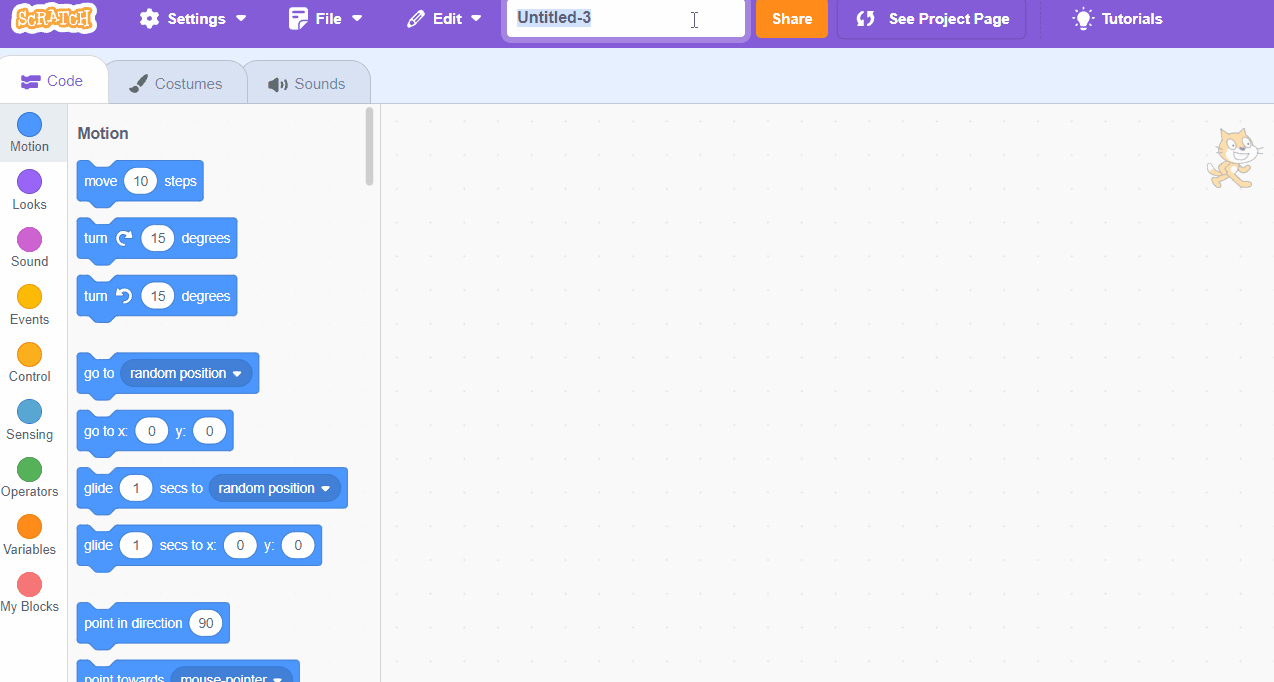
- Now, click on the Motion category (it’s the blue one), and find “change x by 10”. Drag that and snap it right under the “when the right arrow key pressed”.
Moving Left
- Our rocket should move left too! Let’s duplicate the blocks you just made. Right-click on them and choose “duplicate”.

- Change “right arrow” to “left arrow” and “10” to “-10”. Now, when you press the left arrow, your rocket will move left!

Step 3: Add “gravity” to make the rocket fall.
Setting the Fall
- In space, things float down slowly. We’ll make our rocket do that. Find the Events category again and use the “when green flag clicked” block.
- We need to tell the rocket where to start. Go to Motion, find “go to x: y:” and fill in “x: -144” and “y: 123”.
- To make it keep falling, go to Control (the orange category), find “forever,” and drag it under your “go to” block.
- Inside “forever,” go back to Motion and find “change y by”. Put “-4” in it to make our rocket fall.

Step 4: Add the Platform
Creating the Platform
- Our rocket needs a platform to jump from. Click the paintbrush to make a new sprite.
- The click the square icon and draw a rectangle at the center of the screen. This is your platform. It can be any color you like!

Positioning the Platform
- Let’s put the platform in place. Under Events, use “when green flag clicked” again.
- In Motion, find “go to x: y:” and fill in “x: -154” and “y: -55”. That’s where the platform will wait for our rocket.

Step 5: Make the rocket jump when touching the platform.
The rocket jumps!
- We want our rocket to bounce when it touches the platform. Inside the rocket’s “forever” loop, add the “if then else” block from the Control category.
- From the Sensing category (it’s the light blue one), grab “touching” and select the “Sprite1” (your platform sprite) from the dropdown.
- In the “else” part, move the “change y by -4” block you made before.
- For the “if” part, first, we make the rocket jump. Grab “repeat” from Control and type “15” in it.
- Inside “repeat,” add “change y by 4” from “Motion” and “wait 0.05 seconds” from Control after it. This makes the rocket go up for a bit, like it’s bouncing!
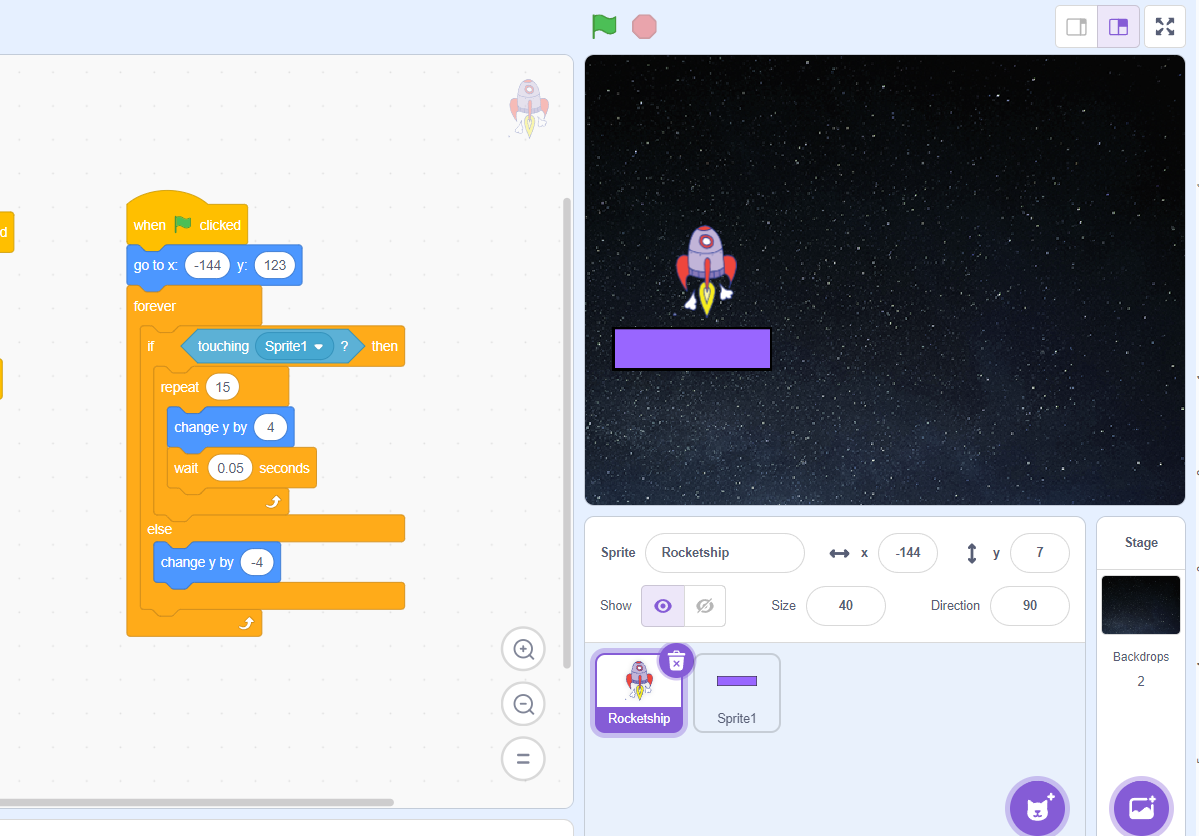

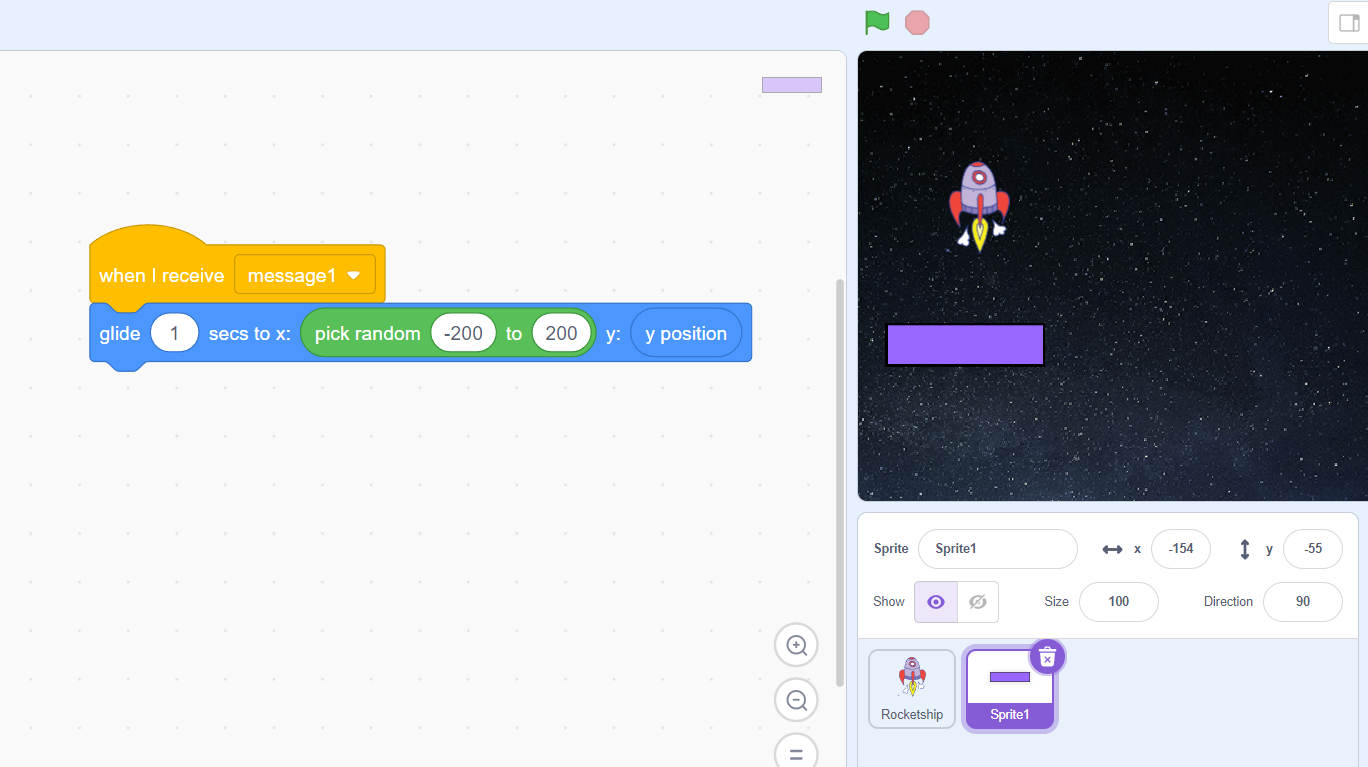
Step 6: Change the platform position every time the rocket touches it.
Moving the Platform
In the rocketship sprite
- We’ll make the platform move every time the rocket jumps. In the rocket’s code, in the “if” part, find Events and use “broadcast message1”.

In the platform sprite
- Wait for that broadcast message. Use “when I receive message1” from Events
- To change the spot, use “glide 1 secs to x: y:” from Motion.
- Set the value of y with y position block from the Motion category. This will make sure the platform remains at the same height.
- For x, add a random block from Operators category, and set the lower limit to -200 and upper limit to 200
This completes our game logic, we can now move our rocket to go left and right, and use the platform to stay afloat.

Step 7: Add scores in the game.
Keeping track of scores
A game is no fun without the scores. To set up scores, create a new variable named Scores.
- Click on the Variables category and choose “Make a Variable”
- Name it Scores, press ok, and you should see it appear in your variables list. Make sure it’s checked off so it shows in your game.

In your rocketship sprite,
- Drag the set the value of Scores variable and position it below the “When flag clicked”. Set its value to 0.
- Inside the if condition, in the “forever” block, add the change value by 1 block. And select the Scores variable from the dropdown.
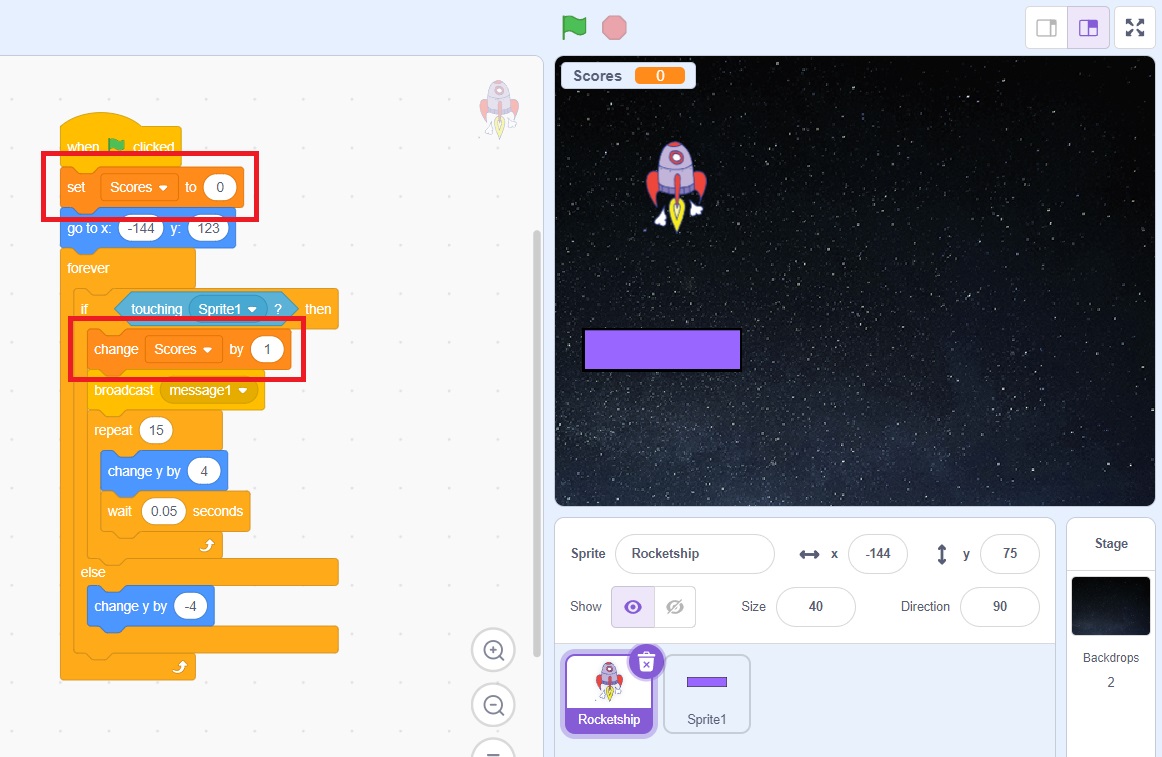
Your game is complete!
Bonus 1: Change costumes of the Rocketship sprite
Change costume when jumping
To add the rotate effect in the rocket, we can change its costume when it goes up.
In the Rocketship sprite
- Drag the “next costume” block from the looks category, and place it inside the repeat 15 block, in the if condition.
- To reset the costume, drag the “switch costume to” block from the Looks category, and place it below the “when green flag clicked” block.
- Select the default costume value. For the rocketship sprite, the costume rocketship-e makes perfect sense, as it doesn’t have any ignition.


Bonus 2: Increase difficulty as the game progresses
Draw more costumes in platform sprite
To increase the difficulty of the game, add costumes to the platform sprite with a smaller size of platform.
- Select the platform sprite, and go to the Costumes tab.
- Right click on the Costume, and select duplicate.
- Decrease the size of the platform in the duplicated sprite.

In the Code tab of the platform sprite,
- Add the “if then” block from the Control category and place it below “when I receive message1” block.
- For the condition of the “if” block, use the > block from the Operators category.
- Inside > block, add scores variable on left side, and any value of scores when you want to change platform on right side. For example, we can use 15.
- Inside the “if” block, add the “Switch Costume” block from the Looks category, and select the costume with decreased size.
- Add another switch costume block and place it below the “when green flag clicked” block.

Let’s play!
It’s time to test your game by pressing the green flag above your game’s screen.
Compete with your friends and see who can score the most scores.
Download Free Printable Scratch Coding Tutorials PDF
Get the Rocketship Landing game and Flying Space Cat Scratch tutorials in a printable format.
Make More Games in Scratch
CodeWizardsHQ firmly believes that initiating the exploration of technology and programming during childhood can pave the way for future success. We have designed a structured program for elementary school coding, that leverages the power of Scratch to teach coding principles.
In the first course, Animation and Games with Scratch, students delve into essential programming concepts, including variables, loops, and conditionals. By the end of this course, they will possess the ability to create their own games and animations using Scratch. This prepares them for their journey toward a future in the ever-evolving world of technology.
Our coding classes for kids allow children to nurture their skills, unleash their imaginations, and experience the joy of learning!