Happy holidays to all of our students and friends. Instead of buying a card this year, use our HTML and CSS tutorial for kids and your programming skills to code a personalized holiday card for your friends and family.
It’s not the same boring card everyone else is buying, you can personalize this card with your style or match the recipient’s. This is an easy HTML and CSS tutorial for kids or anyone starting to learn. We’ll be building this simple holiday card that opens when you hover over it.

This tutorial assumes you understand basic HTML and CSS. Let’s get started!
- Step 1: Add a background image to the page
- Step 2: Add an image to the front of the card
- Step 3: Add a message to the cover of your card
- Step 4: Style the message on the cover of your card
- Step 5: Add a message on the back of your card
- Step 6: Style the message on the back of your card
- Step 7: Add your picture or logo to the inside page
- Finished card!
What you need:
1. Text editor
You can use a simple text editor like Notepad, TextEdit, Sublime Text, etc. You may also use an online text editor like Codepen. Please use the link to set up your account.
2. Base HTML/CSS file.
Download the base folder and open the holiday_card.html file. This folder contains all the images and files you will need to complete your card.
Edit the holiday_card.html file inside of any text editor: for example, Notepad on Windows, TextEdit on Mac, or Sublime Text. You can also use an online text editor like Codepen to edit and run this code. The base files will set up a blank card that opens when you hover over it.
Recommended: HTML and CSS for Kids
Step 1: Add a background image to the page
Add a background image property to the <body> element and cover the entire page. By default, the background is repeated.
Add this code:
body {
      background-image: url('bg.jpg');
      background-size: cover;
}
Output:

Step 2: Add an image to the front of the card
Add a background image property and a background-size to .front. This adds a nice image to the front of our card.
Add this code:
.front {
      background: url('winter_scene.jpg')
no-repeat center darkred;
      background-size: cover;
    }
Output:

We also want the same image on the inside front of the card. Instead of creating a separate style for .page, we will add it to the styles for .front.
Add this code:
.front, .page {
      background: url('winter_scene.jpg')
no-repeat center darkred;
      background-size: cover;
    }
Output:

Step 3: Add a message to the cover of your card
Add a message on the cover using an H1 element inside .front. Include your own holiday message.
Add this code:
<div class="front">
 <h1>Happy Holidays!</h1>
</div>
Output:

Step 4: Style the message on the cover of your card
Style your <h1> element. We’ve added the Google font “Cookie” in our <head> element.
Add this code:
h1 {
 font-family: 'Cookie', serif;
 font-size: 40px;
 margin-top: 40px;
 color: white;
}
Output:

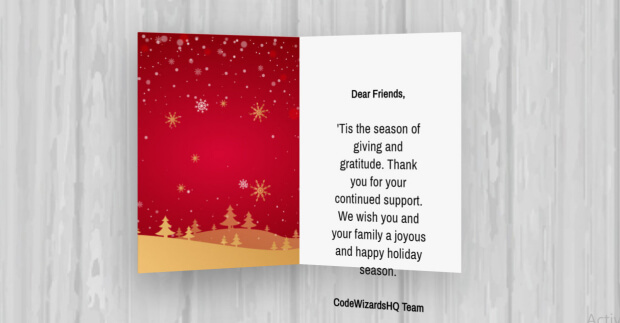
Step 5: Add a message on the back of your card
Inside of .back, add a <div> element with class ‘message’ to hold your headings and paragraph.
Add this code:
<div class="back">
    <div class="message">
    </div>
</div>
Output:
Inside of .message, add a personalized message to your friend or family member with <h5> and <p> elements.
Add this code:
<div class="message">
   <h5>Dear Friends,</h5>
   <p>'Tis the season of giving and
 gratitude. Thank you for your continued
support. We wish you and your family a
 joyous and happy holiday season. </p>
   <h5>CodeWizardsHQ Team</h5>
</div>
Output:
Step 6: Style the message on the back of your card
Add the following styles to .message and text elements.
Add this code:
.message {
  margin-top: 30px;
  color: #900909;
}

h5 {
  font-family: 'Cookie', serif;
}

p {
   font-size: 10px;
}
Output:

Step 7: Add your picture or logo to the inside page
Add an <img> element inside of .page
Add this code:
<div class="page">
   <img src="cwhq_logo.png">
</div>
Output:
Style your <img> element by decreasing the size and flipping it.
Add this code:
img{
   margin-top: 60px;
   width: 90px;
   transform: scaleX(-1);
}
Output:
Your card is complete!
Check out the finished product.
Download the completed HTML and CSS code and open the i_holiday_card.html for the final card project.
Customize this code to create your own holiday card! It’s that easy. Now you can dazzle your friends and family with your coding skills and a thoughtful card too.
Did you code your own card? Share a picture or link and use #CodeWizardsHQ or tag us to be featured on social media.
Learn more about building games and websites in our live HTML coding classes for kids.
Ready to level up your child’s learning experience? See our coding programs for kids ages 8-18: